Monday, January 31, 2011

Rename the blog

Dear Friends,

After writing the blog for a month now, I am in a dilemma. I do not think that the name I have earlier picked for this blog defines the nature of the blog well. Although I am very into baking, at the same time, I love cooking as well. I would appreciate any suggestions for a new name to this blog as to reflect the nature of the blog more appropriately. Your suggestion is much appreciated.

Love,

The Editor

Super Moist Chicken Bake

I love easy recipe. Though most of the time I tend to get carried away, experimenting with labor-intensive recipes from pro-cookbooks or websites, every now and then I like to create something easy for weekday supper. And what is easier than chicken bake. Simple protein, easy to follow recipes that you can bake in the oven and it will be ready in no time. Once you have try this recipe, you will never go back to the box chicken bake at the store.


I have a confession to make. If you are expecting a one step cooking process, then this recipe is a no-no. Then again, we are talking about super moist chicken recipe. And when you want something to be super moist, you have to add moisture. This is when brining comes into place.

You may say, but I am not making a turkey, why the brine? Believe it or not. Poultry needs brining. Especially when you are cooking breast meat. Breast meat tends to have a tendency to dry out in the cooking process as they are lean, which on the other side of the equation is a healthier choice for your heart and waistline. The simple solution is to brine your poultry to avoid dry meat. If you still think it is too much work, ask yourself this: Will you eat a dry piece of turkey breast meat or chicken breast meat? Will you? Will you? 

Brining, no doubt is an added step to your cooking process. However, in the magical world of meat brining, the brining process can be done overnight in your fridge or a cooler box, depending on what you are brining and its size. The simple solution: Brine your meat the night before and stuck it covered in the fridge. When you are ready to cook it the next day, just pull it out, pat it dry with a kitchen towel and it is ready to go.

Recipe for the Brine

Ingredients
3 Tablespoon of Salt (Kosher or Sea Salt preferably but table salt works fine)
3 Tablespoon of Brown Sugar
1 1/4 quartz of ice cold water (about 5 cups)

Directions

In a bowl large enough to hold the brine and chicken pieces, combine all ingredients. Whisk till sugar and salt has dissolve completely. Submerge all chicken pieces into the brine. You may need to make enough brine to cover all chicken pieces. As a rule of thumb, the brine solution above is good for half a chicken (about 4lb or 2kg) or 6 pieces of chicken breast.


When you are ready to bake your chicken, a layer of dry seasoning on the chicken will help to amp up the flavor of your dish. Since the chicken is moist and good enough as it is, a sprinkling of freshly cracked pepper will do just fine. However, if you are me, who is constantly looking for small ways to impart great flavors in every meals, a little seasoning goes a long way.

Homemade Poultry Seasoning


Ingredients
1 tablespoon of Lawry Seasoning Salt
3 tablespoon of brown sugar
1 teaspoon of paprika
1/2 teaspoon of rosemary
1/2 teaspoon of oregano
1/2 teaspoon of sage
1/2 teaspoon of black pepper
zest from one lemon
1/4 teaspoon of cayenne pepper (optional)

Directions
In a bowl, mix all seasoning ingredients. Rub onto chicken pieces right before baking.


And after all your hard work, this is the result. I prefer using skin on, bone-in chicken pieces as we love the crispy chicken skin from the bake. Don't worry if you are using boneless skinless chicken breast. The seasoning will built a crust around the chicken. It will come out just as good.


The chicken came out super moist and extremely flavorful. By rubbing the seasoning on the chicken pieces, the baking process helps to create a nice char crust on the skin. Give it a try tonight. You will have chicken so good that even the finicky eater will give it a thumbs up.

Super Moist Chicken Bake Recipe (Blue Ribbon Seal)

Ingredients
4lb of chicken pieces (about 2kg) or 8 pieces of chicken breast
1 lemon, juiced
2 tablespoon of Olive Oil
1 recipe of Homemade Poultry Seasoning
1 recipe of Brine

Directions
1. Preheat oven to 400F (200C).
2. Pour olive oil onto baking sheet. Spread olive oil evenly onto baking sheet.
3. Dip chicken pieces into lemon juice. Rub seasoning all over chicken. Repeat with the remainder chicken pieces
4. Bake for 30 minutes if using a mix of bone in dark and white chicken meat, skin side up. If you are only using chicken breast meat, bake for 25 minutes.
5. Serve with roasted potatoes, rice or pasta.


Sunday, January 30, 2011

Mama Mia's Chicken Parmigiana


The greatest thing about making a sauce is the variation of dishes you can create to go with it. Okay, the chicken parmigiana has got nothing to do with Mama Mia- the broad way show but somehow it just rhymes. Yes, I said so.


Chicken Parmigiana is one of those spin off meal you can easily create once you have a sauce ready.


Chicken Parmigiana, also known as Chicken Parm here is a really delicious concoction of fried breaded chicken cutlets covered with red sauce and cheese, baked in the oven until all cheese is melted.


The premise is really simple. Bread chicken cutlet by coating lightly pounded chicken breast in flour, egg wash and coat in breadcrumbs. 


Lightly fried with a little olive oil in a pan. Nice and golden.


Ladle sauce at the bottom of the baking dish. Place chicken cutlets in the pan. Cover lightly with sauce. Top with shredded mozzarella and bake till cheese has melted. 


Served with pasta of choice or make it into a Chicken Parm sub in between bread rolls.

Easy Chicken Parmigiana
Serves 4 - 6

Ingredients
2 pieces of boneless, skinless chicken breast, cut into 3 portions, lightly pounded to 1/4 inch thick
1/2 Cup of flour
2 eggs, beaten
1 Cup of breadcrumbs
3 tablespoon of olive oil
1 1/2 Cup of Sauce
1 Cup of Shredded Cheese (Mozzarella, Monterey Jack or Cheddar)
Salt and Pepper to taste

Directions
1. Season chicken breast with salt and pepper.
2. On your kitchen counter, set up your working station. Prepare a dish for the flour, a dish for your egg wash and a dish for your breadcrumbs.
3. Season your flour with salt and pepper. In your egg wash bowl, break the eggs and season with salt and pepper. Whisk till well combined. 
4. First, take a piece of chicken and dredge in flour. Dip in egg wash and coat with breadcrumbs. Placed on a plate. Repeat till all chicken breast is well coated.
5. In a pan, heat up the olive oil over medium heat. Pan-fried chicken till it is golden brown. Set aside. Repeat till all chicken pieces is browned.
6. Preheat oven to 375F(190C). In 13'x 9' baking dish or larger, ladle 1/4 cup of sauce onto the dish, Make sure the dish is lightly covered with sauce to avoid chicken pieces from sticking to the pan.
7. Place chicken pieces in a single layer on the dish. Cover with remainder of the sauce. Top with cheese.
8. Bake in the oven for 15 mins till cheese is all melted.
9. Serve with pasta or baguette as a meal.

Variations: The recipe can be used to create eggplant parmigiana or other meat of choice. For other meat, repeat the same process. To make eggplant (aubergine parmigiana), slice eggplant to 1/4 inch thickness. Sprinkle some salt onto eggplant and let rest for 10 minutes. Wipe moisture from eggplant with a clean towel or paper towel. Proceed to step 3 and continue to finish the eggplant.


Friday, January 28, 2011

Meatballs in Sauce

We love mom's meatball in dad's sauce. They go so well together. Just like mom and dad : ) The best part is, you can have two meals in one. Serve the meatballs with pasta for one night and make a meatballs sub with melted provolone on it the next day.

Since I have already shared dad's sauce recipe, the meatball part is really simple.

Mom's Meatball Recipe

Ingredients
1lb ground beef
1 large egg, beaten
1 tsp oregano
1/2 teaspoon of black pepper
1 cup of plain breadcrumb
5 tablespoon of grated parmesan or romano cheese

Directions
1. Place ground beef in a large bowl
2. Add in all the other ingredients.
3. Mix till well combined.
4. Separate into 15 meatballs. Shape by rolling in hands till round.
5. Heat a pan with 2 tablespoon of olive oil over medium high heat.
6. Once oil is hot, brown meatballs in batches. Drain well. Repeat till all meatballs are well browned.
7. Place meatballs in sauce. Let cook for 3 hours in sauce.
8. Served with pasta or in a sub.


Once the meatball has been properly formed, brown the meatball in a pan with some olive oil. It will take about 5-7 minutes to brown the meatball properly. It will still be raw in the center and that is fine. The cooking will be done simmered in dad's red sauce.

Drained the meatball well so that your sauce will not be greasy

At this point, just wait for the sauce to come up to a boil. Place the meatball in the sauce and let it simmer for 3 hours.


Served the meatball with pasta or on french baguette with melted provolone cheese.

Thursday, January 27, 2011

Tuesday's Red Sauce Nite

Every family must have a particular dinner tradition at home. The Darragh's have Monday hotdogs nites and Tuesday's Red Sauce Nite. Apparently mom and dad started the tradition when they first got married. Not to say that there is anything wrong with it. A lot of times, fixed menu nites do make life a lot easier particularly if you are the one planning the family meal all week long. 


Neither mom nor dad has Italian blood in the family. But for some reason, they love their red sauce. Not just anybody's red sauce, rather it has to be the sauce made by dad. See, dad has a very distinct measurement method when it comes to cooking. Whatever he likes and the look right method, which basically means you have to make it enough to know what should be in there and how it should smell and taste. A little known fact about dad, he doesn't taste anything while he is cooking. For some reason, he can just tell by smell and look. How he manages to do that remains a mystery to us. 

And they have their preference for canned tomatoes too. In the summer when tomatoes are abundant in our garden, dad will make his fresh red sauce which is out of this world. Come fall and winter, we have to rely on canned tomatoes, which is not bad if you get Dad's favorite brand. Not all tomatoes are the same and Hunt's tomatoes just seems to work great in a sauce.


The process is pretty simple. Brown any meat you are using with olive oil. Add in the onion. Let it brown for 5-7 minutes.


Add in the whole tomatoes, water and paste. Let simmer for at least 3 hours.

And the biggest secret is, sauce taste better after it has sit overnight in the fridge. To re-heat, just put the sauce on medium low. Stir occasionally until sauce heats through to avoid burning. Takes about 1 hour to re-heat and please don't rush it. Burnt sauce never taste good.

Serve with your choice of pasta shape and grated parmesan or romano cheese.

Dad's Red Sauce
(Serves 6 to 8)

Ingredients

2 lb (about 1 kg) of Italian sausage or pork or ground beef
3 tablespoon of olive oil
2 28-oz (793g) cans of Hunt's whole or diced tomatoes
2 5-oz can (141g) cans of Hunt's tomato paste
1 large onion, finely chopped
2 teaspoon of oregano (you can opt to use Italian seasoning or a mix of oregano and basil)
a scant 1/4 teaspoon of baking soda; optional (we use it to reduce the acidity of the tomato sauce)
3 tablespoon of grated parmesan or romano cheese and extra for serving
Water

Directions

1. In a large pot, heat 3 tablespoon of olive oil over medium high heat.
2. Brown meat till a crust is formed. Turn meat over to brown the other side. Add in chopped onion.
3. When onion has softened, add in tomatoes and paste. Use a little water to rinse out the leftover tomatoes or paste in the can. Add the water to the pot. You do not need to add much water to do that.
4. Stir to combine. Let the mixture comes to a boil.
5. Add in baking soda and cheese. Reduce heat to medium low. Let the sauce simmer for 3 hours, uncovered. Stir periodically to make sure it doesn't stick to the bottom of the pot. If it does, reduce heat further. Just make sure that sauce is at a low simmer.
6. Let cool completely and store in refrigerator over night. Sauce taste better this way as the flavor has enough time to meld.
7. To re-heat, place pot on low heat. Stir occassionaly to avoid sticking to the bottom of pot. Reduce heat if necessary. Heat through, about 1 hour on low heat.
8. Serve with your choice of pasta cut and a sprinkle of parmesan or romano cheese

Wednesday, January 26, 2011

Pizza, pizza, everywhere


We love pizza night. Once every two months or so, we will have a pizza night at home. It is just an easy recipe and so simple to make at home. We have never order out for pizza ever since mom and dad got this recipe from mom's brother years ago.


We may not live in Italy but pizza is huge in the States. We love our version of pizza here, thin crust, extra sauce, extra cheese, with or without toppings, white sauce, barbecue sauce. In fact, the only limitation to pizza's topping is your imagination.


I was debating earlier on if I should post the pizza dough recipe on this blog. See, the dough recipe is a very touchy, family guarded secret recipe that is being handed down from one generation to the next. Every Italian grandmother will have their family's recipe and the matriarch will always tell you not to divulge the family's secret recipe to anyone.

Not that we have an Italian grandma in our family, (sometimes I wish we do. Think of all the secret recipes to be had), but we obtained the recipe from mom's brother who in turn obtained the recipe from his friend when they were in the service together. Rumor has it that the friend of my uncle is from an Italian family which runs a pizza joint in New York City. He was sworn to secrecy on the pizza dough recipe and mom had promised that the recipe will only stay in the family.

Needless to say, after much deliberation, I have decided not to share that secret recipe we are using, out of respect to the generous Italian gentleman from New York. However, I did find a pizza dough recipe online, which is close enough to the one we are using. I have given that recipe a try before and the result is pretty good, I must say.

The next criteria for a good pizza is the sauce. Red being the primary favorite, I am referring to tomato sauce, of course is another issue which sparks arguments everywhere. There are two general school of thoughts here. Cooked sauce or uncooked sauce.

Cooked sauce refer to a tomato sauce cooked slowly on the stove top and refrigerate overnight for the base topping of the pizza. Uncooked sauce is the one that you open a can and add dried herbs into it. Voila, that's your sauce. We usually go for the uncooked sauce as we find it has a fresh tomato taste. Our favorite brand is Pastene - Kitchen Ready, followed by Hunt's.

Go ahead! Make your own pizza today. You will not believe the amount of money you can save by making your own. Throw a pizza party for your kids next time. You will be one cool mama for serving pizza at your child's next birthday party.


Adapted from Anna Maria Volpi 

Basic Pizza Dough

wp13ff8eec_1b.jpg

Her blog will include a step-by-step guide on how to prepare the pizza dough by hand, which I find just as effective compared to using a stand mixer.

Sauce for pizza
I 28oz can Pastene-Kitchen Ready Tomato Sauce or Hunt's Tomato Sauce (Not to be mistaken with ketchup) 
1 teaspoon of dried oregano
1 teaspoon of onion powder or 1/2 a small white onion (chopped)
2 tablespoon of sugar
*Alternately, use any barbecue sauce, store bought white sauce of your choice. Just omit the herbs and seasoning

Topping
1lb mozzarella cheese, grated and separate into two portions (preferably block mozzarella cheese)
any meat topping, pre-cooked, diced
any vegetable topping, diced
*Alternate to mozzarella cheese, you can also use grated cheddar from a block. Please do not use the Kraft singles cheese. It doesn't work that way.

Method
1. Preheat oven to 450F or 230C.
2. Roll out pizza dough onto a pan. We love to roll out our pizza dough to fit a baking sheet.
3. Put enough sauce to cover the pizza. We usually cover two whole 12'x18' pizza sheets with one 28oz can of tomato sauce. If you are making 3 12-inch pizza, I reckon you will only need 1/3 cup of sauce to cover each pizza
4.  Top with meat and vegetable topping of your choice. Remember, less is more. Do not overload your pizza. For a 12-inch pizza, 1/4 cup of topping will suffice. For 12'x18' pizza, I will recommend 1/2 cup of toppings.
5. Top with grated cheese. 
6. For 12'x18' pizza, bake for 16 minutes, total, rotating the pan halfway through baking. For 12' pizza, the baking time will decrease to about 12 minutes.
7. Remove from oven, slice and serve.

Tuesday, January 25, 2011

Ginger Snap Cookies


It is freezing cold in New England now. Perfect time for baking. Something that reminds me of the warm and fuzzy feeling which the weather outside has so successfully ripped me of. Plus, Valentine's Day is coming soon and I am preparing to send the picture montage for grandma down in Florida. *Lucky her*

In comes Ginger Snap cookies. I remembered baking them for the first time last Christmas. It was such a hit at home and with grandma that the right thing to do is to bake her a batch of these babies for Valentine's Day. Departing from the usual sugar-free cookies I bake for her, I find it unusually difficult to find a sugar-free recipe for Ginger Snap. Still in the research phase, let's hope that I will be able to come up with a recipe which produces sugar-free ginger snap as good as the real ones.


A few technique I adhere to when baking cookies. Firstly, measure all your dry ingredients in a bowl. Flour, baking soda, salt and spices


Secondly, cream your butter or any fat you are using well. It is extremely important that the fat is creamed perfectly till it is light and fluffy, approximately 5 minutes with an electric mixer or hand mixer. If you are using a whisk, it may take a little longer but still doable.


Thirdly, measure your sugar well. Sugar is considered liquid in baking terms. White sugar can be measured in a cup, loosely, while brown sugar has to be packed into the cup to ensure accurate measurement.


Next, add in the sticky liquid, if using. Like molasses or honey, these liquid has a tendency to stick onto any measuring devices used, i.e. cup or spoon. The best way to go about it is to lightly spray a non-stick oil-based spray onto the cup or spoon before measuring out the sticky liquid. Alternately, pour a few drop of oil onto the cup or spoon and spread it with a paper towel or your fingers.


Next, add in your dry ingredients to the wet ingredients mix. I prefer to work in batches, usually three, to ensure even mixing.

Finally, once everything is well incorporated, gather all the cookie dough and shape it into a log. Wrap it in plastic wrap. Refrigerate for at least 1 hour, preferably overnight. This gives a chance for the fat to re-solidify. Cookies bake better that way and prevents it from spreading out too much during the baking process.


Give this a try and let me know if you like it.

Ginger Snap Cookies
(From one of the trusted baking site, Joy of baking)
http://www.joyofbaking.com/Gingersnaps.html


Ingredients

3/4 cup (170 grams) unsalted butter, room temperature
1/2 cup (105 grams) dark brown sugar
1/2 cup (100 grams) white granulated sugar
1/4 cup (60 ml) unsulphured molasses
1 large egg
1/2 teaspoon pure vanilla extract
2 cups (260 grams) all purpose flour
1/2 teaspoon baking soda
1/4 teaspoon salt
1 1/2 teaspoons ground cinnamon
2 teaspoons ground ginger
1/2 teaspoon ground cloves

Garnish:
1 cup (200 grams) granulated white sugar

Directions:

1. In the bowl of your electric mixer (or with a hand mixer), beat the butter and sugars until light and fluffy (about 2 - 3 minutes). 
2. Add the molasses, egg, and vanilla extract and beat until incorporated. In a separate bowl whisk together the flour,bakingsoda, salt, and spices. 
3.Add to the butter mixture and mix until well combined. Cover and chill the batter for about 30 minutes or until firm. 
4.Preheat the oven to 350 degrees F (180 degrees C). Line two baking sheets with parchment paper. 
5.Place about 1 cup (200 grams) of white granulatedsugar in a medium sized bowl. 
6.When the dough has chilled sufficiently, roll into 1 inch (2.5 cm) balls. Then roll the balls of dough into the sugar, coating them thoroughly. 
7.Place on the baking sheet, spacing about 2 inches (5 cm) apart and, with the bottom of a glass, flatten the cookies slightly. 
8.Bake for about 12 - 15 minutes or until the cookies feel dry and firm on top.  (The longer the cookies bake, the more crisp they will be.)
9. Cool on a wire rack. 
Makes about 4 dozen cookies


Sources:


Monday, January 24, 2011

For the love of quiche


The weather has been horrendous here in New England. It doesn't make dinner planning easy at home. It is like a battle between comfort food and trying to eat healthy all the time. I mean, there is only so many times you can make meatloaf, chicken pot pie, chicken noodle soup and etc. And it is not easy at all to try to incorporate the limited selection of vegetables I can cook. Mom is really picky when it comes to vegetables.

And than it strikes me. Quiche. I remember my first bite of quiche in a French cafe. It was like a food revelation. I know it is just pastry, cream and egg. But it is pastry, cream and egg. I try to make supper as healthy as possible and honestly, I am almost out of idea on what else to make. It is like a vicious cycle trying to come up with new dinner ideas everyday. Browsing blogs and food website day and night, reading cookbooks for new ideas and worse yet, the process repeats itself every single day.

The best moment is always when Eureka strikes. Quiche tonight it is. Starch, protein and vegetables all in one. How cool is that!


So it all begin with a crazy idea at 2 in the afternoon. Must bake quiche for supper tonight. First thing first, hunt down a good quiche pastry recipe. For supper, it is only appropriate that the quiche comes in a deep dish form. A hearty serving of eggs, vegetables and cheese, covered with a flaky buttery crust in a cold winter night. Bliss!

Back to the crazy idea's thought, yes, it is crazy to plan making a quiche in such short time. What does a girl do? Check out the food network website, that is. I browsed through a number of quiche recipes on the website and finally settled with Tyler Florence's recipe. He is one of my favorite cook show host. I find most of his recipe simple yet flavorful.

Referring to his pie crust recipe, I made alterations here and there using innovative yet scientific techniques a.k.a. whatever I have in the fridge, and come up with my own pie crust and quiche filing recipe. I am very satisfy with the end result.


Since I have just posted my mom's pie crust recipe, one must wonder why I do not use the same recipe for the quiche. See, quiche is different. I know the premise is similar, however, pastry for quiche needs to have that body, while retaining its flakiness. You will know what I mean if you have made over 10 quiches so far. This new hybrid of pastry crust for the quiche is really good. I especially love the fact that it can hold everything together without being too heavy. With thee, I am very pleased.


Wonderful Quiche with Chorizo, Onion, Mushrooms and Bell Pepper

Recipe
For the Crust
2 cup of all purpose King Arthur's flour (remember what I say about King Arthur's)
1 teaspoon of salt
1/4 teaspoon sugar
1 stick of cold butter, cut into small pieces
1/4 cup of shortening, put in the fridge for 30 minutes before using
1 egg yolk
3 tablespoon of ice water, or more if needed

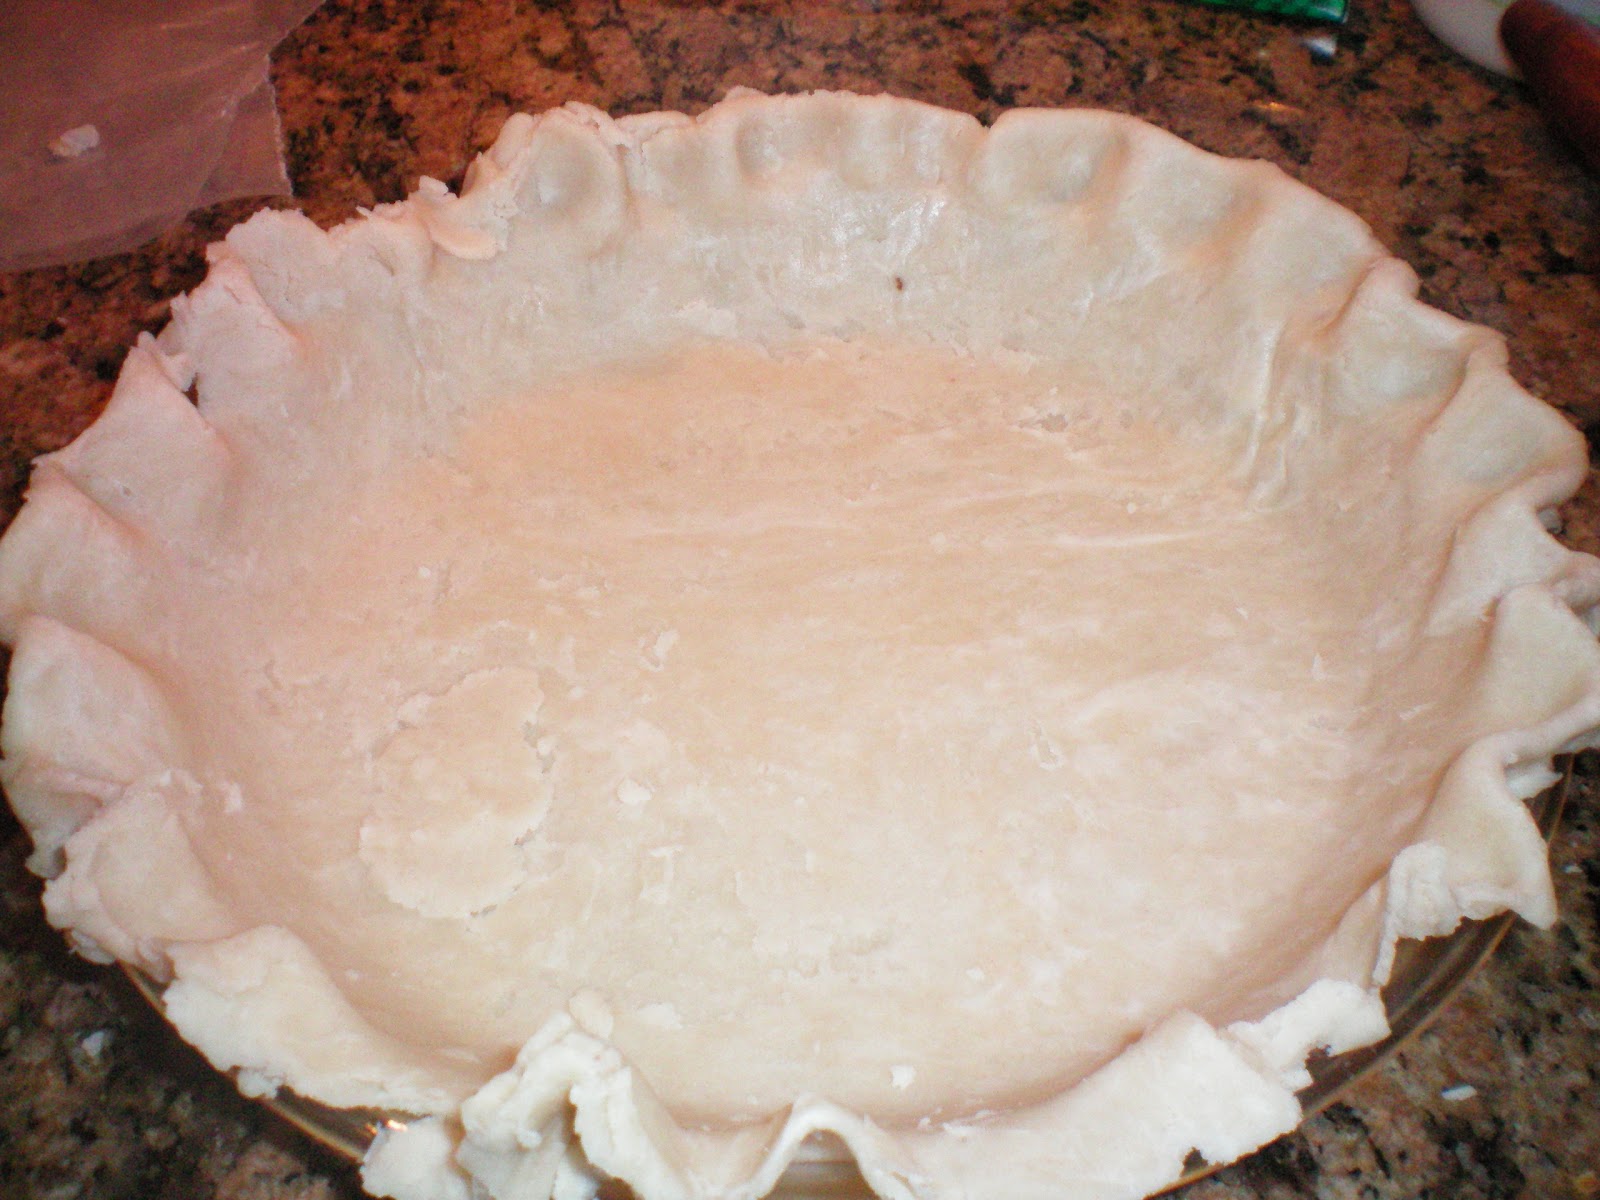
1. In a large bowl, mix flour, salt and sugar. Using a pastry knife, cut in butter and shortening till mixture resembles coarse breadcrumbs.
2. In a small bowl, combine egg yolk with 3 tablespoon of ice water. Beat till well combined.
3. Pour into flour and fat mix. Test if more water is needed by taking a small chunk of dough and squeeze. If it is crumbly, add another tablespoon of water to the mix till dough holds together when tested.
4. Gather dough into a bowl. Squeeze tight like how you will make a snow ball.
5. Flatten into a disk and wrap in cling wrap. Place in the refrigerator for 30 mins before using.
6. When ready to roll the dough, place dough in between two wax paper.
7. Roll dough into 14-inches diameter. Unroll dough into a 9-inch spring form pan. This step will take some practice. Press snugly onto the bottom of the pan. Trim off excess dough.

For the Filling


1/2 lb of chorizo, Portuguese hot sausage, diced
1 large onion, sliced thinly
1/2 red bell pepper, diced
1 cloves of garlic, chopped fine
8 oz button mushrooms, sliced
8 large eggs
1 1/2 cup of milk
1 cup of shredded sharp cheddar cheese or Monterey jack
salt and pepper to taste

1. In a large pan, turn heat up to medium and saute chorizo till most fat is rendered. Remove chorizo with slotted spoon and set aside.
2. Turn heat down to medium low. With the remaining grease on the pan, saute onion till it caramelizes. About 20 minutes. Remove and set aside.
3. Add a little oil onto pan, if necessary. Saute mushrooms till golden. Sprinkle with salt and pepper. Remove and set aside.
4. Preheat oven to 375F (190C).
5. Break eggs in a large bowl. Whisk like you would when making scramble egg. Add in milk, salt and pepper. Whisk till combined.
6. Begin to assemble by placing the spring form pan on a baking sheet. First, place prepared filling onto bottom of crust. Spread it evenly. Add in chopped red bell pepper. Pour egg mixture into crust.
7. Cover pan loosely with foil. Bake for 1 hour. Remove pan from oven.
8. Remove foil and sprinkle on cheese to cover.
9. Place pan back into oven and bake for another 15 minutes. Remove onto a wire rack and let cool for 30 minutes.
10. Using a spatula, loosen the quiche from side of pan. Un-mold the ring and transfer carefully onto serving plate. Serve warm or at room temperature, either on its own or with a salad.


Sunday, January 23, 2011

Mom's Pie Crust Recipe


Something just happened today. All of a sudden, I start craving for pie. Not any pie but sweet potato pie. My first time making a sweet potato pie too. I have never attempted to bake this before and well, there is always a first for everything.


Let's take care of business. Step number 1. The crust. I have seen my mom making apple pie before, so I should be able to make the crust. Somewhere among all the blogs I have read, I learned a new technique on rolling the crust out between wax papers. It really makes rolling out pie crust dough extremely easy.

Crust is a funny thing. I have seen some recipes which called for a whole eggs in the mix or just egg yolk, cream, milk, cream cheese and etc. The variation is endless. I have to agree with my mom that a perfect crust has to be flaky and not sweet. Mom always said let the filing does the sweet talking and she is right.


The basic of pie crust is flour, fat, salt and water. Mom followed a very old recipe which she has gotten from the extremely old, red, Betty Crocker's cookbook. You know it is good when some of the recipes called for lard. Mom said they used to use a lot of lard in baking and the crust always come out flaky and light, something that a lot of new recipe is missing. Give this pie crust recipe a try and you are well on your way to make old-fashioned pie

Mom's Pie Crust Recipe
-Makes one single 9-inch crust

Ingredients:

1 cup of Flour
1/2 teaspoon of salt
1/3 cup plu 1 tablespoon of shortening
2-3 tablespoon of cold water

Directions:
1. Mix all dry ingredients in a large bowl.
2. Add in shortening. Cut shortening into flour with a pastry cutter till mixture resembles coarse breadcrumbs.
3. Sprinkle 2 tablespoon of water onto flour and shortening mix. Gather dough into a ball.
4. Test if dough has enough moisture by taking a small pinch of dough and break it. If dough crumbles, add another 1 tablespoon of water to the dough.
5. Shape into a ball as you would shaping a snowball.
6. Cover with a moist kitchen towel or plastic wrap. Let sit for 15-20 minutes.
7. In between 2 pieces of wax paper, roll dough out with a rolling pin to about 12 inches wide to cover a 9-inch pan or 10-inches wide to cover a 8-inch pan.


Semi-healthy New England Style Sweet Potato Pie


Blame it on the weather or something else but I have been having this really bad craving for sweet potato pie. I wasn't quite sure of what type of sweet potato pie I want to make. Do I want to try making a southern style sweet potato pie or something lighter.

There is nothing wrong with a southern style sweet potato pie except for the amount of sugar, butter and condensed milk that is in it. Now, I really want a pie that is just sweet enough and light. Pie shouldn't be a forbidden food. If done right, I am pretty sure it is alright to eat pie at least once a month. *Fingers crossed*

The next thing to decide on is whether to make my own filing or buy a canned pie filing from the store.
Now, if you are like me, penny pinchers out there, a pound of sweet potato is $0.69 while a 15oz can of sweet potato is $1.39. Well, I'll let you do the math.


After a split second deliberation,  ta-daaaaaaaa. Making my own filing after all. It is relatively simple. Preheat the oven to 400F. Place the sweet potatoes on a baking sheet covered with foil. Let it roast in the oven for 1 hour till it is fork tender. When cool enough to handle, peel of the skin and mashed the sweet potatoes.

Now back to the filing. I want a sweet potato pie which is sweet enough yet light cos I don't want to feel guilty for indulging my sweet tooth. After reading through a few recipes, I decided to make my own New England Style Sweet Potato Pie, if there is such a thing. The premise is simple. Use a New England Squash Pie recipe, and substitute it with sweet potato. It might work.


The filing taste good. The texture is a little stringy because of the sweet potato. Still good.


Pie Crust from Mom's Pie Crust Recipe


Ta-daaaaaaaaa. My New England Style Sweet Potato Pie


New England Style Sweet Potato Pie
1 9-inch pie crust (Recipe will be posted next)
15 oz sweet potato filing ( homemade or store bought)
1/2 cup of white sugar
1 teaspoon of ginger
1/2 teaspoon of cinnamon
1/2 teaspoon of nutmeg
1 1/2 cup of milk
2 eggs, well beaten

1. Preheat oven to 425F.
2. Mix all filing ingredients together till well combined.
3. Place pie pan on top of a cookie sheet.
4. Once oven is ready, pour filing into pie crust. Bake at 425F for 20 minutes.
5. After the 20 minutes, turn temperature down to 375F. Bake for another 45 minutes.
6. Remove from oven and let cool.
7. Once pie has cool to room temperature, refrigerate in the fridge for at least 6 hours or overnight.
8. Serve as is or with a dallop of whipped cream.

Saturday, January 22, 2011

Asian Style Coconut Bun


If you love coconut like yours truly and love the fluffy texture of bread from the Asian bakery, this is a must try. Whoever thought of the idea to placed the filing in the bread prior to baking is a genius. Short of deserving a Nobel for the great invention, I love the portability of these breads, starch, protein, fiber...everything you need for a meal in a bun.


Now, I can't take credit for creating these lovely puppies, after all, they are widely available in every Asian bakeries in Chinatown. I would love to think that these are some sort of a mother's dream come true. A concoction you can make during the weekend and just pop them in the little kids' lunch boxes. My husband refers to them as bread pouches, as it holds the filing in the center. When done right, these bread can be a surprisingly good staple in lunch boxes all across the country. Why waste your money stopping for a sandwich at lunch time when you can easily make these at home over the weekend and have them stored in the fridge for the hectic weekdays. A minute in the microwave is all it takes to give these bread a hot off the oven taste.


Personally, I love sweet filing in the bread for breakfast and a savory one for lunch.

Asian-Style Coconut Bun
(Adapted from Angie's recipe - The bread baker extraordinaire on the blog, seriously!)

Ingredients:

Dough:
a:
285 g Bread flour,
42 g Sugar,
½ tsp Salt,
6 g Dry active yeast/1 tsp instant yeast
b:
30 g Egg,(1/2 an egg)
85 ml Warm milk,
c:
22 g Butter

Filling:
60 g Butter,
30 g Vanilla pudding powder (or milk powder or custard powder),
3 tbsp Sugar,
20 g Coconut shreds

Topping:
30 g Shortening,
20 g Butter,
40 g /confectioner's/Icing sugar,
40 g Cake flour,
½ pc Egg,
¼ tsp Salt,


Method:
Add dough ingredients (a) and (b) in a mixing bowl. Mix with dough hook at slow speed for 1 minute. Change to the medium speed, and continue to mix on slow speed for 3 minutes on medium speed until a dough is form. Add (c) butter gradually and mix for approx. 5 minutes on medium speed until gluten is fully developed, i. e. elastic, smooth, non-sticky and leave from sides of mixing bowl.

If you are old-fashioned like me and enjoy your bread kneading workout, combined (a) and (b) in a large bowl. Mix till dough is formed. Placed it on a lightly floured surface and work (c) gradually into dough while kneading. Continue kneading till dough is elastic and smooth, approximately 10 minutes.


Leave dough in a lightly greased bowl. Cover with a damp clean kitchen towel. Placed in a warm place until dough is double in volume, roughly 1 hour. Proofing time may be longer, depending on the weather. If dough did not double in volume, extend proofing time.
Note: I like to turn the oven on at 170F for 2 minutes. Turn off the oven. It should be barely warm. Make sure dough is fully covered by damp towel. Placed bowl inside oven and close the door. This helps with proofing the dough during winter months.

Once it has done proofing, punch dough down to release gas. Divide into 6. Shape into rounds and let rest for 10 minutes, covered with damp towel.

Preheat oven to 350F.

Beat butter and sugar of the filling ingredients until creamy, blend in pudding powder and coconut shreds.
Mix 2 kinds grease from the topping and then sift in the confectioner's/icing sugar. Combine well.
Gradually add in egg and salt. Beat until well-combined. Sift cake flour into the mixture. Blend.
Place the whole mixture in a pastry bag.


Press each portion into a round and place some stuffing in the middle of dough, seal the edge and shape each into the long shaped bun. Pipe topping onto bread roll.

Bake for about 15 minutes. Rotate the pan half way during baking time to brown evenly.