Wednesday, February 27, 2013

Skoleboller - Norwegian Sweet Custard Buns with Coconut

When one perfect batch of Norwegian Cardamom Sweet Buns is enough to jolt you out of the boring cinnamon buns world (okay, I may have exaggerated the cardamom buns a little, it may rival the potency of a good cinnamon buns but never replace it), a good baker, read obsessive compulsive, will strive to outdo herself.

What is more perfect than to make a variation of the famous Norwegian Hveteboller?


In come Skoleboller, loose translation reads as School buns. I believe they called it school buns because all children seems to enjoy it, and the school cafeterias serve them in droves. The children became adults and they continue to eat them. Next to the regular boller at the bakery and convenience stores in Oslo, you will find the Skoleboller, which, a true fan of these babies will tell you that it is the best sweet bun ever created.

What is not to like of these vanilla custard filled buns? A pudding center with the bun surface surrounding it smeared with icing sugar and topped with a good layer of coconuts. Perfection, I am telling you. I served these to my 3-year old niece, and she proclaimed it, "Yummy!" (Apparently, that is the highest honor you will get from a toddler)


Skoleboller (Norwegian School Buns)

Ingredients
For the Buns
One batch of basic cardamom bun recipe

For the Filling
I 3.4oz box instant vanilla pudding
1 cup of cold milk

For the Toppings
2 cups of icing sugar
enough milk to make a thick spreadable icing
1 cup of coconut flakes (I prefer sweetened)

Directions
1. Prepare cardamom buns dough following the recipe here. After you have divided the dough into 12 equal portions and let it rise for another 30 mins, this is when the skoleboller process begins.

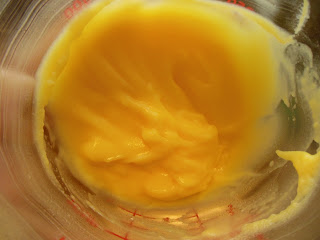
2. Prepare the vanilla pudding. In a clean bowl, combine the instant vanilla pudding powder with 1 cup of cold milk. Whisk for a min or two till filling is set. Place in the refrigerator till you are ready to use them. You can opt to make homemade vanilla pudding for this recipe.

Please remember that the pudding has to be thick, hence the reduction in milk used to the instant pudding powder ratio above.

3. Preheat the oven to 375F. Using your thumb or the back of a soup spoon, make an indentation on the buns, deep enough to hold at least 1 tablespoon of custard filling. Make a bigger well if you really like vanilla custard with buns.

4. Spoon the vanilla custard into the indentation you have made.

5. Brush the surface of the buns with milk. Bake for 15-20 minutes till bread is golden brown but before the vanilla custard is browned. Remove from the oven and let it cool completely on a wire rack.

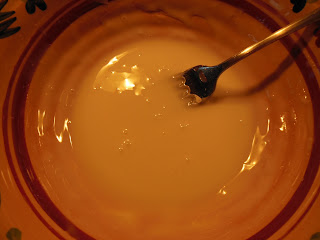
6. In a bowl, combine icing sugar and milk to make a thick, spreadable sugar topping. Remember, you want it to look white and thick.

7. In a separate bowl or plate, place about 1 cup of coconut flakes. Dip the surface of the bun onto the coconut flakes and press down lightly to get a good coating of coconut on the bun.

8. Voila, you have just make the famous Norwegian Skoleboller. Some blog sites also note that Skoleboller happens to be one of the first Norwegian food that is commonly loved by expatriate in Norway.

Note: This is not the healthiest buns in the world but a little indulgence goes a long way. For this recipe, I used a mix of white whole wheat flour and all purpose flour to make the buns to somewhat satisfy my conscience. The buns came out just as good.


Monday, February 25, 2013

Hveteboller - Norwegian Cardamom Sweet Buns

Hi hi!

I have just returned from my sojourn to Norway for a month and boy, was I influenced by their bread culture. Yup, you heard me right, bread culture. Bread, apparently, to a Norge, is not the white, hearty, bland, off the shelf variant that we are so used to getting at the store.

Bread to Norwegians is literally, life giving sustenance. I will explain why I said that. Do you know that a typical Norwegian daily diet consist of at least 7 servings of bread, 2 for breakfast, 2 for lunch, 3 for snack, and 2 more for dinner. I said at least because, well, some people eat more bread than others. And yes, they can have bread for dessert too. Fastelavnsbolle or Shrove Tide Bun, traditionally filled with whipped cream and refrigerated. Of course, there are many variants to the sweet buns these days given their growing economy including Kringles, Cinnamon rolls, and etc.


But back to my favorite of them abundance variations of bread in Norway, Hveteboller, the tiny little cardamom-scented sweet buns where you can buy 3 boller with a small coffee for NOK29 (about US$5) at all coffee shops and convenience stores in the city. Yup, they are huge fans of coffee too, the beverage of choice which they consumed almost religiously from morning till night. My kinda paradise, if you ask.

The best way to have the cardamom-scented bun is toasted with jam and slices of brunost, the Norwegian's famous brown cheese, which is literally not a cheese but more a by-product of cooking whey from goat cheese production till the mix caramelized and then shaped into blocks. Think Kraft singles and you will have a fairly rough idea of brunost. Except brunost has a caramel sweet taste to it, it sticks to the roof of your mouth, and it is strangely addictive.

If you have a Whole Foods outlet near you, go and get your brunost fix. I heard that you can find the Tine's Ski Queen brand sold under the name of geitost, which essentially is the same as brunost. Geitost being the old Norsk word for it. I still have ample supply of brunost from my trip to Norway, so, I have yet to wander to a local Whole Foods on my hunt for this strangely satisfying dessert cheese almost dairy produce. Not quite sure how much it will cost for a 2lb block but mine didn't come cheap either.

Back to the buns, if you are like me, you love the citrus-vanilla taste of cardamom, then I dare you to bake these boller (Norwegian for buns: boller-plural, bolle-singular). You can filled them with different fillings and bake them to other variant of boller but for the basics, I thought we can start with the popular Norwegian snack food of choice, Hveteboller.

Norwegian Hveteboller - Cardamom-scented Sweet Buns
Makes 12
Ingredients
1 1/2 cup of bread flour
1 1/2 cup of all-purpose flour plus 1/4 cup for adjustment
1/4 cup of butter
1/4 cup plus 1/8 cup of sugar
1 1/4 cup + 1/8 cup of lukewarm milk
1 packet of active dry yeast or 75g of fresh cake yeast if you can find them
1/4 tsp of salt
1 1/2 tsp of freshly ground cardamom (or use your meat tenderizer to pound those cardamom seeds)
Milk for brushing

Directions

1. Microwave milk in a microwave dish on high for about 1 1/2 min. Combine butter into milk and stir till it melts. Let mixture cools to lukewarm (or you don't feel like you are burning your fingers when dipped into the mixture.)


2. Add in 1/8 cup of sugar and yeast. Let yeast blooms. It should take about a min if you have the temperature right. Longer, if the mixture is too cold, and trust me, you will see no action if the mixture is too hot. If the latter happens, throw the mixture out and start over.


3. In a clean bowl, measure out the 3 cups of flour mix. Add in the salt and stir to combine.


4. On a board, split the cardamom pods to obtain the seeds. Pound with a meat tenderizer or use your coffee grinder to get about 1 1/2 tsp of ground cardamom.

5. In a large bowl, pour in the milk, butter, sugar, and yeast mix that has bloomed.

6. Add in the flour mix and cardamom. Stir with a wooden spoon to obtain a soft dough that will leave the side of the bowl easy. You will need to add in about an additional 1/4 cup of flour to obtain the desired consistency. Sprinkle some flour on top of the dough.


7. Cover the bowl with a clean kitchen towel and let rise in a warm dry place for about 15 mins. After 15 mins, place dough on a lightly floured work surface and knead for about 5 mins till you obtain a silky smooth bread dough that will not stick to your hands or work surface. Grease the bowl and the bread dough lightly. Cover with kitchen towel and let rise for another 45 mins or till dough has doubled in size.

8. Once dough has risen enough, divide dough into 12 equal pieces. Shape dough into rounds and place them on a baking sheet lined with parchment (or you can just grease your baking sheet). Again, cover with a clean kitchen towel and let rise for another 30 mins till dough has risen.
9. Preheat the oven at 375F. Brush bread dough with milk. Bake in the oven for 18 mins till buns are golden brown. Let cool on a wire rack before serving, haha, or you can just slather these buns with butter as soon as it comes out of the oven and enjoy!

Hint: If you want to store these buns for later, let the buns cool completely on a wire rack. Place them in a ziploc bag. For longer storage, you can place the buns in the bag into the freezer. They almost keep indefinitely. Just warm them up in a toaster oven for 5 mins before serving, less if they are sliced. You can also microwave them for 50 seconds if they come right out of the freezer just before serving.

Friday, February 22, 2013

Beef Rendang - Rendang Daging Tok

What do you do to a perfect looking piece of beef brisket that you got cheap from the grocery store?

Nope, not into meat curing yet, so corned beef or pastrami is out. I was thinking of using the beef brisket to make a Cantonese style beef stew, which is always a favorite. However, my other half decided that winter is perfect for making beef rendang and yellow sticky rice.

Seriously? Where did he get that from?


To add to the problem, I have never used brisket to make beef rendang before. Usually, I will go to my standby of top or bottom round, and London broil. Brisket is a tough cut of meat, with connective tissues all over that the only way to tenderize them is long over of cooking. Then again, rendang or Malay style dry curry is essentially a stew. Why not give it a try?

I remember tasting the curry beef brisket when I was in Hong Kong, and they did get the meat to turn so melt in the mouth tender and the deep flavor of the brisket works really well with the play of spices in the curry paste they used.

The recipe that I use in making rendang was taught to me by a close friend's mum years ago. She was originally from the Perak state in Malaysia, hence, her recipe of making rendang is referred to as Rendang Tok. The spice paste featured a strong presence of turmeric, and unlike rendang of other variations, it is cooked till dry.

However, for my family, they love a little bit of gravy with their yellow sticky rice. Hence, I usually leave mine a little wet compared to the traditional ones. Feel free to cook the rendang till the gravy has all evaporated. You will be rewarded with one tasty pot of spicy, coconut, beef curry stew that will keep you nice and warm in the winter months.


Rendang Daging Tok

Ingredients
1.5lb to 2lb of beef (brisket, top round, bottom round, sirloin or London Broil)
10 large shallots or 20 small shallots
10 dried hot peppers, deseeded and soaked in hot water till soft (more if you like yours spicy)
6 cloves of garlic
4 inches of fresh or frozen turmeric
4 inches of ginger
2 inches of galangal
3 stalks of lemongrass, white part only (or 5 heaping tablespoon of frozen chopped lemongrass)
2 Tbsp of fennel
1 Tbsp of cumin
3 pieces of kaffir lime leaves, finely shredded
1 piece of turmeric leaf, torn roughly (Optional if you can't find it at your Asian grocery store)
1/2 cup of vegetable or canola oil
1/2 cup of water
2 cups of thick coconut milk
6 Tbsp of fried coconut flakes (kerisik)
salt and palm sugar (or brown sugar) to taste

Methods
1. In a food processor, combine shallots, rehydrated hot peppers, garlic, turmeric, ginger, and galangal. Add in lemongrass as well if you are using the frozen chopped variant. Process ingredients into a fine paste. Add a teaspoon of water if necessary to aid in the grinding process.
2. Cut beef brisket to about 1-inch pieces.

3. In a wok or heavy bottom pot, add in 1/2 cup of oil and turn the stove to medium low. Add in the ground spices. Let cook until aromatic and oil begins to separate from the ground spices. Stir occasionally as they burn easy.

4. Once the ground spices are cooked, add in the beef brisket. Stir in half a cup of water and turn heat up to medium high. Let cook until mixture comes up to a boil. Continue to let it simmer at medium low till water is reduced, about 30 mins. Stir occasionally.
5. Once water has evaporate to a quarter of its original level, add in the two cups of coconut milk, kaffir lime leaves, fresh lemongrass stalks, and turmeric leaf, if using. Continue to let the stew cook for another hour or so till meat is tender and gravy has been reduced to very thick consistency. You are looking at about 1/3 of its original level. Stir every 20 mins. Season with salt and palm sugar.
6. Once gravy has thickened to the desired consistency, add in fried coconut flakes or kerisik. Cook for another 10 mins till all gravy has evaporated and your beef rendang looks dry.

7. Beef rendang is best served with steamed yellow sticky rice (recipe to come later).

Note: Traditionally, kerisk is made out of dry fried fresh coconut flakes and then pounded. If using substitution, heat up a wok on low and add in coconut flakes. Stir till coconut flakes turned golden brown. Pound coconut flakes in a mortar or pestle. You can also grind it in a food processor.