Monday, December 10, 2012

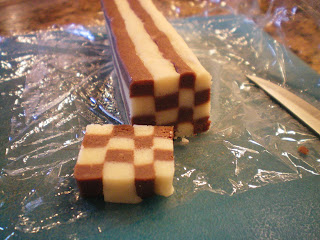
Checkerboard Cookies


I have always been fascinated by the checkerboard cookies. Well, at least when I was a child anyways. They look so geometrically correct, which, if you happened to be extremely interested in math and science as a child, you would really fall in love with the construction of something so symmetrically correct. Did I just lose you right there?

Anyhow, making checkerboard cookies have not crossed my mind in ages since I preferred the lazy ways of drop cookies. Hey, in an era where many do not cook, let alone bake, I consider myself pretty darn good for keeping the cooking and baking from scratch tradition alive. No apologies there.

For my first attempt, I started with a small batch, which was a HUGE mistake. Had I known then that the process is going to be so tedious, I would have made a bigger batch, just so I have a lot of dough to freeze. They will be my thaw and bake cookies for emergency purposes or Christmas.

Speaking of which, the urge to bake something new started with the dawn of the merry season. So many pre-Christmas parties to go to and I hate the fact to show up empty handed. Part of me would love to do that, would kill to be able to let myself to do that. Nope, not gonna happen this lifetime. So, off to baking we go.

Checkerboard Cookies Recipe
Makes about 3 dozens

Ingredients
1 cup of butter, softened
1/2 cup of sugar
1 tsp of vanilla
2 1/2 cup of flour
1/2 tsp salt
3 Tbsp of Cocoa Powder or melted chocolate, depending on what you have in your pantry

Directions
1. In the bowl of a stand mixer, beat butter and sugar till light and fluffy. Add in vanilla extract and continue to beat for another minute.


 2. Add in flour gradually, and mix till a dough is formed. Divide filling into two portions. Take out one portion and place it on a sheet of plastic wrap. Shape dough into a 8 by 12 rectangle. Cover tightly with plastic wrap and let rest in the refrigerator.

3. To the remaining dough in the mixer, add in the cocoa powder. Mix till it is well combined. Repeat the process to shape dough into a rectangle. Cover tightly with plastic wrap and let rest in the refrigerator till dough is firm, about 30 minutes.


4. Once dough has set, unwrap the two dough on a work counter layered with a fresh piece of plastic wrap. Place the white dough on the base. Top with the chocolate dough. Wrap tightly with plastic wrap and press to ensure the two dough adhere to each other.

5. If dough softened at this time, place it back into the refrigerator for 30 minutes till it is firm again. You do not want to work with the dough if it has softened. The color will combined together and you will be left with a swirl cookie dough instead of checkerboard.

6. When dough is firm enough to work with, trim off the edges of the dough so you will have perfect square edges. We are vying for 90-degree angle at every corners.This is when all those years studying math comes in handy. Remember exponent? Well, even if you don't, trust me, math comes in handy at this point. Makes it easier for one to visualize what is going to happen next in order to get the checkerboard pattern. It is nothing more than a 3x3 or a 4x4 matrix that we are shooting for. I hope I have not lost you yet. Please bear with me, this system will make the checkerboard cookies making experience a whole lot easier compared to stacking the cookie dough strip-by-strip.

7. We start out by cutting the stacked cookie dough in half, lengthwise. The dough needs to be long. Stack the opposite color on top each other, preferably cut side to cut side, that gives you the perfect 90 degree angle, or close to it. Now you have a brown and white, brown and white stack. That is good.

8. Next, you will want to measure out the longer length of the dough. Divide the diameter of the strips equally. You need at least 12 or 16 strips altogether, again depending on the final measurements of your dough. I promise, this is easier in reality than trying to explain it in words.

9. Stack the strips in alternating colors. You can do either a block of 3 strips or 4 strips, depending on how many strips you manage to cut out from your dough.

10. Once you have stack them together, wrap the log in plastic wrap.  If you have leftover dough like I do, simply roll it out into a flat piece.

Wrap the log of dough with the leftover cookie dough. This is a good trick to salvage whichever strip of dough that threatens to fall apart on you.Refrigerate for at least 2 hours before baking.


11. When you are ready to bake, preheat oven to 350F. Slice cookie dough to 1/8 inch thickness. Bake for 9-11 minutes till bottom is golden brown and cookie is set. Bake any longer, and the color will just combine and you will lose the checkerboard pattern which you have worked so hard to achieve. Let cool to room temperature on a wire rack before storing or you can eat one right away as soon as it sets.


Note:
a) This recipe can easily be doubled. I used my standard shortbread cookies recipe as I like the buttery light cookie dough. I did not use any egg wash or water to bind the stacks together.

b) As long as you press them together firmly before refrigeration, the stacks should stick together. If you feel more comfortable using egg wash to bind the layers together, feel free to do so.

c) Just remember, never ever ever work with the dough if it softens too much. Just wrap it in plastic, put it back in the refrigerator for 30 minutes till it firms up before working with the dough again.

Monday, December 3, 2012

Turkey Floss Bread Roll

Remember those turkey meat floss I have made in my last post, well, I kept some in a tight container for the next project. Turkey floss bread roll or pinwheels.


Pretty cool looking, huh? In any case, this is not a success story. I have never had much luck when it comes to rolling bread or cake. It did not surprise me at all when my bread roll cracked whilst I was trying to roll it. They still come out tasty, nonetheless.

I copied the recipe from Angie's Recipe. Hers look great, mine not too hot. You can hop over to her site for the complete recipe. I will try this recipe again with my own bread dough. Once I manage to get a perfect roll out of the bread, I will write a new post on it. Meanwhile, enjoy the pics.


Thursday, November 29, 2012

Homemade Chinese Turkey Floss/ Turkey Rou Sung

If you have ever have a taste of the Chinese meat floss or any pastry item from a Chinese bakery using meat floss, then you will know how good this meat product is. For those who have not, the idea of a meat-based cotton candy type food can be off putting. In reality, think of pulled pork only dehydrated. Kinda like pulled pork jerky, if you will.


Now, you can usually buy this pre made at any decent Asian grocery store. Some better tasting ones will originate from manufacturers in Taiwan. However, if you are sick and tired of paying over $18 for a pound of pulled pork jerky like I do, and you are a fan of this, you should absolutely try making this at home.

Or in case, Thanksgiving was but a week ago and you found yourself left with over a pound of roasted turkey breast and no one in the family is willing to have another turkey sandwich or pot pie, you can try using the turkey breast for something that won't remind them of Thanksgiving dinner at all, hence, a great reason to make this.

I should warn you however, that this is no easy task. Takes about half an hour of non-stop stirring and spatula chopping action to get the turkey looks like cotton candy and get it to the desired crispiness. Fear not, because the reward is sweeter than you think.

Homemade Turkey Floss

1lb of cooked turkey breast (you can use cooked chicken breast, leftover roast pork, etc)
2 1/2 Tbsp of soy sauce
1 Tbsp of oil (use only if meat is dry, i.e. turkey breast, chicken breast, very lean pork)
5 Tbsp sugar or to taste
1/2 tsp chicken stock powder (optional)
1 tsp 5 spice powder
1 tsp chili powder (optional)

Directions


1) Slice leftover turkey, chicken or pork into thin strips. Place them inside a freezer bag.


2) This is the fun part. Using a meat mallet, pound the meat till it is completely flatten and then some. This step is important as it helps to loosen the meat, which will cut short the time you will require when stirring and cooking the meat later.


3) This step is completely optional. If you are anal about getting all pieces completely loosened up and cutting the cooking time to its shortest, use a rolling pin and run it over the bag for, say ten times, just to make sure that they are very close to falling apart.


4) To make your cooking and stirring time a lot shorter, shred the meat into even finer pieces with your fingers before placing them into the wok. This will take less than 5 minutes.


5) Turn the heat to medium. Start stirring the meat in the wok, pressing visible large strips into small bits. Remember, the goal is to get a cotton candy like texture. At this point, I hope you have all the seasoning ingredients mixed in a bowl. Continue to cook and stir the meat for the next 10 minutes before adding the seasoning. It burns easy after you have add the seasoning into the meat.


6) Add in the seasoning, stir, stir, and stir. It is important to toss the meat mixture around the wok and always scrape the bottom of the wok to ensure nothing sticks. Turn the heat down to medium low or low if you find the meat browning up too quick. After 30 minutes, your meat floss should look like the picture above. Now, if you don't want your meat floss to get crispy, you can pretty much stop at this point.


7) Another 5 minutes, and your pork floss will turn crispy. Let the mixture cool in the wok, off heat. You can eat as is, or store them in a jar for use later.


That is how it should look like. And yes, I stored mine in a jar because the next baking project I have in mine will require this meat floss as an important ingredient.

Monday, November 12, 2012

Steakhouse Sweet and Soft Dinner Roll

I don't know about you but each time I go out to a steakhouse, I so look forward to their complimentary dinner rolls and blue cheese chopped salad. Not that because I am cheap (maybe, a little) but those complimentary dinner rolls are to-die-for, literally, and I can make a meal out of the bread and salad in any given day. Forget the steak. For me, the best part of going to a steakhouse is the good rolls and salad. Period.


Now, if you are like me, who are somewhat extremely confident of your bread making prowess, you will want to replicate the dinner rolls at home to impress guests over, say a potluck party or dinner at home. Heck, Thanksgiving is approaching.

How many of those copy cat recipes I have tried so far which lauded the supposedly "kitchen secret" of those steakhouses' dinner rolls you may ask? Well, let's just say that I have tried enough of them which made me lost count and none of them made me feel comfortable enough to serve to a crowd. For one thing, they are not even close to the texture, taste and color of those steakhouses' dinner rolls I was vying for.

That is, until I went and search through the archive of King Arthur's Flour Website and found this keeper. My-oh-my what a great surprise! Those dinner rolls were really good. It took superhuman strength not to eat them all when it came fresh out of the oven. Then again, I guess you really cannot eat all 18 or 20 of them in one sitting.

The one thing which everyone who frequents King Arthur's Website by now will realize that since the company began selling their fancy add-ons baking condiments (note that I used the term loosely here), their new recipes all looked like a hard sell marketing collaterals.

Case in point, why do we need a clearjel to thicken pie filling, sauces, puddings, and etc? Grandma used cornstarch, and most recently, after reading through my newly inherited old recipe box from Grandma, arrowroot starch is the preferred thickener thickening agent minus the starchy, gummy texture. So, pray tell, why can't they state that in their recipe? Yeah, I understand, money sustain a business, and I don't blame them but for home bakers, most of us would like to use on hands ingredients at home, or easily accessible ingredients from our grocery store, without having to pay for shipping. Get the idea, now?

My new mission, I will still bake, as-is, but if I can come up with the perfect substitute for a cheaper ingredient which does not require for the home bakers, like myself, to procure via the Internet or pay a premium for, I will bring you the good news.

Back to the rolls, oh yeah, the rolls!

Steakhouse Sweet and Soft Dinner Rolls
(Adapted from King Arthur's Flour )
Makes 20 dinner rolls

Dough
1 1/3 cups (10 5/8 ounces) warm water
4 tablespoons (2 ounces) butter, softened
1/2 cup (6 ounces) honey
2 3/4 cups (12 1/2 ounces) King Arthur Unbleached Bread Flour
1 3/4 cups (7 3/4 ounces King Arthur 100% White Whole Wheat Flour
2 teaspoons salt
4 tablespoon molasses or Indonesian brand sweet thick soy sauce (the original recipe calls for caramel coloring, which I couldn't find. If you have some on hand, use 1 Tbsp powdered, or 2tsp liquid)
2 1/2 teaspoons instant yeast

Topping
yellow cornmeal


Directions
1) Combine flours, salt and yeast in the bowl of your stand mixer. Using the dough hook, let the mixer run on low to combine the mix well.

2) Add in all liquid ingredients and butter, drizzling slowly till the mix combines.

3) Turn mixer on to dial number 3, and let it knead for 10 minutes. The dough should form a cohesive dough but still sticky to the touch. Turn dough into a lightly oiled bowl, cover with a damp cloth, and let rise for 1 hour. Note: The dough won't double in size but will be puffy.

4) If you choose to knead this by hand, start with combining all the dry ingredients in a large bowl. Form a well in the center and mix in all wet ingredients, except for butter. Mix with hands till a dough is formed. It will be very sticky. Knead in the butter.

5) This is when it gets really sticky, literally. Turn dough out onto a lightly oiled work surface and knead the dough for at least 15 minutes. You will need to add more oil to your work surface as you go. Resist the temptation to add flour, else you will risk some really tough dinner rolls later.

6) Proceed to let the dough rise in a lightly oiled bowl, covered, for at least 1 hour.

7) We are almost there. Prepare a baking sheet. Sprinkle generously with cornmeal. 

8)Divide the dough into 20 pieces and shape it into rounds. Sprinkle more cornmeal on top of the rolls. Cover with a damp cloth. Let rise for another 2 hours. I know, this is unconventional but believe me, you won't regret this! I promise!
9) Preheat oven to 350F. Bake this rolls for 15 minutes or till top is golden brown. Rotate the pan halfway through baking time.

Note: Mine does not require more than 15 minutes. However, if you are making 2 trays of this in the oven at the same time, you will have to add more time to the total baking time. Say, another 2 - 3 minutes or so.


Grab a stick of softened butter and proceed to make your way to bread heaven! Advise, eat it while it is hot, warm is acceptable but seriously, it will never make it to the cool stage at my house.

Monday, October 8, 2012

Grandma's Secret New England Coffee Cake Recipe

I have not been blogging for a while. Work and family commitment have been keeping me really busy for a while here. Sorry bout that.

To make it up to everyone, I thought, what could be better than to share some hand me down recipes which I obtained from my 89 years old grandma? Believe me when I say this is her secret recipe. I have never had her coffee cake ever...cos when I get to know her, (my hubby's grandma, really) she was 85 years old and had stopped baking at that point.


So, when grandma sold her house in New England to live full time in Florida, she thought of passing down all her recipes in her old cute recipe box to me, knowing how much I love old fashioned, trusted recipes. While I was browsing through her collections of cakes and sweets, this one stood out to me. And boy, was I good in spotting a good recipe from the pile.

The coffee cake came out rich, moist, buttery, and cinnamon-y! It was so good that I baked this cake three days in a row and it kept disappearing overnight. The best part about the recipe is that it only uses a stick of butter or 1/2 cup for the entire 12-inch cake, which is not too much if you have been baking for a while. Give this a try and I promise you will never buy another coffee cake at the store.


Grandma Glady's Coffee Cake Recipe (Makes 1 12-inch cake)

For the Cake Batter
1/2 cup butter or margerine (I prefer butter)
1 cup of sugar
2 cups all purpose flour, sifted
1 tsp baking powder (I use double acting)
1 tsp baking soda
1/4 tsp salt
2 eggs
1 cup sour cream (use regular, not light)
1 tsp vanilla

For the Streusel Toppings and Fillings
1/2 cup of brown sugar, packed
1/2-1 cup of chopped walnut (I used close to 1 1/4 cup cos I love walnut)
1 tsp cinnamon powder

Directions
1. Combine flour, baking powder, baking soda and salt in a bowl. Set aside. Preheat oven at 350F. Grease and flour a 10 cups tube pan (about 12-inch).
2. In your stand mixer or a bowl, cream butter and sugar till light and fluffy. Beat in eggs and vanilla till well combined.
3. Add in flour, alternate with sour cream and mix till batter is well combined. (Batter will come out really thick)
4. In a bowl, combine brown sugar, walnuts, and cinnamon. Mix well.
5. Scoop half the cake batter into tube pan. Spread till you get an even layer.
6. Sprinkle half the streusel mix evenly onto the cake batter.
7. Top with remaining cake batter. Spread to get an even layer, enough to cover the streusel filling.
8. Top cake with remaining streusel. Sprinkle to get an even layer.
9. Bake for 40 to 45 mins. ( I usually set the timer at 40 minutes and check. It should be done by then.)
10. Rest cake for 20 minutes before removing from pan. Slice only when cake has cooled completely as it will crumble and fall apart if you give into temptation to slice the cake when it was still warm. 
(I know it is hard but please try)

Wednesday, May 23, 2012

Homemade Silver Needle Noodle aka Lou Shu Fun

I forgot which famous figure once said invention comes out of desperation or something to the tune of improvisation comes out of desperation but recently, I find that saying is true. Just the other day when I thought of something to do which will fulfill my target of "Doing Something For the First Time" (more about that some other time), I came across this blog page which I have bookmarked for ages now.

An hour and a half later, this is what happened.
Now, if you live in Asia where you can get this noodle anytime you want, you really have no purpose making this at home. I will advise you not to cos it is very time consuming and all you get out of this is a cup of the noodle. However, since I do not live in Asia anymore and I can't for the life of me find this in the Asian grocery I frequent, that will have to do.

To reward myself for all the hard work, perseverance, and that moment of adding another item to my first time list, I make myself a delicious bowl of minced meat silver thread noodle, of course. Who wouldn't? Honestly, the end result is so good that I don't think I will mind making this again in....say......next year?

Silver Needle Noodle (Adapted from Do What I Like)
Ingredients:
140g wheat starch
60g tapioca starch
pinch of salt
170ml boiling hot water
2 tsp olive oil

Method:
1. Put all the dry ingredients into a mixing bowl. Add in the boiling hot water and stir with a pair of chopsticks. Cover with a wet towel and leave to cool for 5 minutes.
2. Add in the olive oil and knead till you get a smooth dough.
3. Roll into two log-shaped pieces and cut them into small pieces about 3g each. Shape dough with your hands.

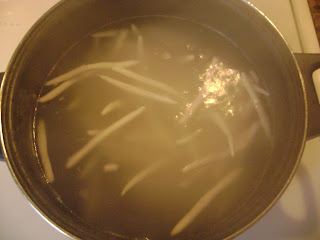
4. Put some oil into a big pot of hot water and cook the noodle till transparent.

5. Once the noodle is cooked, drain and put them into a mixing bowl, add one teaspoon of olive and toss the noodle around (to prevent them from sticking to each other). The noodles turn transparent after rinsing in cold water. I'd say you should probably boil it for at least 10 minutes before draining the noodles and rinse it under cold running water. Remember to stir the noodles while boiling to avoid them from turning into a hot boiling glue in the water.
6. Chilled overnight before using.


Wednesday, May 2, 2012

Black Russian Rye Bread

If you have been to Outback Steakhouse, Cheesecake Factory, and/or Bugaboo Creek, then you will clearly understand the need for any home baker to emulate those tasty delicious bread they served to you with whipped butter shortly after you placed your orders. Oh, those sweetish dark brownish morsels of baked dough goodness.....and then it hit you one day, what in God's name are those breads?

I like to think of it as in bread from the pumpernickel/rye family. If only it is that simple. For some, I don't know what reason, it tastes DIFFERENT. I have tried many a recipes that claimed to be the copycats of breads baked in these establishments but no....they didn't come close at all. That's it until I found Beth Hensperger and her Bread Bible. Of course those breads are of Russian's and Eastern European's origin. Why didn't I think of that all those years ago? Bummer!

So, step 1 to identify the recipe to follow is over. I know exactly what I am looking at and the Black Russian Rye Bread came highly recommended by other food bloggers out there. Said to be the closest and even better rendition of those tasty brown morsels of bread served at the above mentioned establishments. Good!

On to the recipe, a quick scan and the first thought that came to my mind was OMG! I have never ever see a longer list of ingredients required to make a load of bread ever in my entire life. I try to convince myself that it came highly recommended and that if I really wanna free myself of the clutches from those chain restaurants (if I am honest, I really don't care too much for their food aside from the bread. Oh, the bread!), I better give it a shot.

Will I ever attempt something like this again, OH, YES! The bread came out absolutely TO DIE FOR! If you have a stand mixer or a bread machine, it should be relatively easy to make this bread with the help of those equipment. Even if you have to knead it with your hands, please try this recipe at least once. This bread is OH, SO WORTH IT!

Russian Black Bread
(Adapted from Beth Hensperger’s The Bread Bible)Makes 2 loaves


Ingredients
2 packages (1 1/2 tablespoons) active dry yeast
Pinch of sugar
1/2 cup warm water (105 to 115 degrees)
2 cups water
1/4 cup molasses
1/4 cup apple cider vinegar
4 tablespoons unsalted butter
1 ounce unsweetened chocolate, chopped fine
1/2 cup whole-wheat flour
3 cups medium rye flour
3 cups unbleached, all-purpose or bread flour
1 cup wheat bran
2 tablespoons caraway seeds or ground caraway
1/2 teaspoon fennel seeds or ground fennel
1 tablespoon salt
1 tablespoon instant espresso powder or instant coffee powder
1 tablespoon minced shallots
1/4 cup cornmeal (optional)
1 tablespoon unbleached all-purpose flour (optional)
1 teaspoon caraway seeds (optional)


Directions

1. In a measuring cup, combine the 1/2 cup warm water, pinch of sugar, and active dry yeast. Stir well to mix. Let stand for 10 minutes till foamy.

2. In a pot, combine 2 cups of water, molasses, apple cider vinegar, butter, and chocolate. Heat over medium heat till butter and chocolate are melted. Set aside.
3. In a large bowl, combine all the three flours. Whisk till they are well-mixed. Set aside.
4. In the mixer bowl attached with the paddle attachment, place 2 cups of mixed flours, the wheat bran, 2 tablespoon of caraway seeds, fennel, salt, espresso, and shallots.Turn mixer on to low speed. Gradually, add in the yeast and chocolate mixture to form a smooth batter. Beat at medium speed for 3 minutes.
5. Reduce mixer's speed to low. Gradually, add in mixed flours, half a cup at a time, till dough clears the side of bowl. Dough should be sticky but firm.
6. Stop the mixer. Remove the paddle attachment from mixer. Scrape paddle clean of dough. Replace with dough hook.

7. Turn mixer speed to low. Continue to add mixed flour to dough, 1/4 cup at a time, with the machine running till dough clears the side of bowl. You will have at least 1/2 cup to 3/4 cup of mixed flours left. Let dough continues to knead for the next 3 minutes on low. 
8. Once dough is done kneading, gently roll dough out onto a lightly floured work surface. Use the remaining mixed flours to dust your work station. Form dough into a ball. 

9. Lightly, grease your mixer's bowl with vegetable oil. Place dough in bowl and turn it over once to grease the other side of the dough. Place a cling wrap over the bowl. Cover with a clean kitchen towel. 

Let rise in a warm place for 1 1/2 to 2 hours. 

10. Once dough is done proofing, gently deflate dough. 

Divide dough into 2 portions on a lightly floured surface.
11. Form into rounds. Place seam side down on parchment lined baking sheet.

12. Cover loosely with plastic wrap. Let rise for 45 mins to 1 hour.

13. Preheat oven to 350F. Slash a X on top of the dough right before baking.
14. Bake for 45-50 minutes. Bread is done when you can hear a hollow sound when bread is tapped lightly with your fingers. If you have an instant read thermometer, the temperature should read between 200F and 210F. Mine takes about 60-65 minutes to bake.  
15. Let cool completely on a wire rack before slicing.


Note: 
-The original recipes called for the caraway and fennel used in the recipe to be in the seeds form. However, if you are like me, and do not like to bite into seeds when eating your slice, grind the seeds into powder before adding it into your dough.
-I have made this bread using ground cumin instead of caraway. It tasted great if you are a cumin fan.
- The recipe calls for wheat bran, which essentially is the outer husk of wheat. I have substitute the wheat bran with wheat germ (the inner part of the wheat) using what I have on hand aka "I have totally forgotten to buy the wheat bran on my last grocery trip", it works just fine.
-If you like a darker color bread, closer to pumpernickel, increase the molasses from 1/4 cup to 1/2 cup
- An instant read thermometer is really handy in this case. The color of the rye flour, molasses, and chocolate in the recipe makes it almost impossible to approximate if the bread is done by visual appearance.
- You can also shape them into loaves and bake in a loaf pan for 50 - 55 mins.
- If you choose to make this into petite rolls, divide dough into 16 portions. Shape into rounds. Bake for 20- 25 mins.

Friday, April 27, 2012

Cheese Sticks or Buns

Nope, if you are looking for the American Cheese Stix aka thick strips of cheese, breaded, and fried.....this is not it. The Cheese Sticks I am referring to is the bread topped with shredded cheese that you can find in most Asian bakery. Why? The better question is why not? Instead of doing PB&J for lunch, something new with a little twist should make for an interesting light lunch or snack.

Yeah, I can take the easy way out and just called it Asiago bread but there is a problem to it. First, I am not using Asiago although the appearance of these buns do look like one. And secondly, I still feel that it is somehow wrong to term the Asian style bun as bread. Bread to me is more of the European style hard crust, hearty, and kinda like steel sitting in your stomach-type of bread. The Asian's bakery style bun on the other hand has a soft and thin crust with a fluffy light interior.

So, no! I don't think they are the same at all and cannot in all my years as a baker, group this different types of baked flour yeast-ed goodness in the same category. You just have to bear with me on that one. Back to the cheese sticks, these babies are really great. It is nice and soft, with the crispy crunchy melted cheese exterior. Beats those cheese crusts in Asia's pizza hut's cheesy crusts anytime. Anyone in Asia or Middle East has, by any chance, try the latest hamburger stuffed crust pizza in Pizza Hut there yet? I am curious to know how it will taste. Intrigue? Most definitely! You can read more on it at AHT - Serious Eats.


Cheese Sticks or Buns
Ingredients
Dough
300g bread flour (King Arthur brand if you can)
30g sugar
70ml warm milk
75g water roux
1 egg, beaten
1 tsp salt
1 packet Active Dry Yeast (About 7g or 1 Tbsp)
45g butter

Toppings
2 cups of shredded Mozzarella
1 cup of shredded sharp cheddar
1/4 cup of grated Parmesan or Romano cheese
1 egg, beaten
Paprika
Dried Parsley Flakes

Directions
1. In a bread machine, combine all the dough ingredients in the order as prescribed by the manufacturers.
2. Set bread machine on dough cycle and let it knead and proof the bread dough till double in size. Mine take 1 1/2 hours.
3. After dough is done proofing, divide it into 10 portions (about 50-55g each)
4. Shape it into a round. Cover loosely with a clean kitchen towel and let rise for 10 minutes before shaping.
5. Once dough is done resting, press flatten one portion of dough with a rolling pin. Then roll it up into the shape of an oblong. Repeat with the rest of the dough. Cover with clean kitchen towel. Let proof for 45 to 50 mins until it doubles in size.

6. Preheat oven to 350F/175C.
7. Brush dough with egg wash.

8. Mix the shredded Mozzarella and sharp cheddar in a bowl. Generously top dough with cheese. Sprinkle with Parmesan/Romano.
9. Bake in the middle rack of the oven for 15 minutes, rotating the pan halfway for even browning. Once bread is out of the oven, sprinkle lightly with dried parsley and paprika. Let cool on wire rack for 10 minutes before serving.
The best tasting soft fluffy cheesy bread you will ever taste.