Wednesday, May 23, 2012

Homemade Silver Needle Noodle aka Lou Shu Fun

I forgot which famous figure once said invention comes out of desperation or something to the tune of improvisation comes out of desperation but recently, I find that saying is true. Just the other day when I thought of something to do which will fulfill my target of "Doing Something For the First Time" (more about that some other time), I came across this blog page which I have bookmarked for ages now.

An hour and a half later, this is what happened.
Now, if you live in Asia where you can get this noodle anytime you want, you really have no purpose making this at home. I will advise you not to cos it is very time consuming and all you get out of this is a cup of the noodle. However, since I do not live in Asia anymore and I can't for the life of me find this in the Asian grocery I frequent, that will have to do.

To reward myself for all the hard work, perseverance, and that moment of adding another item to my first time list, I make myself a delicious bowl of minced meat silver thread noodle, of course. Who wouldn't? Honestly, the end result is so good that I don't think I will mind making this again in....say......next year?

Silver Needle Noodle (Adapted from Do What I Like)
Ingredients:
140g wheat starch
60g tapioca starch
pinch of salt
170ml boiling hot water
2 tsp olive oil

Method:
1. Put all the dry ingredients into a mixing bowl. Add in the boiling hot water and stir with a pair of chopsticks. Cover with a wet towel and leave to cool for 5 minutes.
2. Add in the olive oil and knead till you get a smooth dough.
3. Roll into two log-shaped pieces and cut them into small pieces about 3g each. Shape dough with your hands.

4. Put some oil into a big pot of hot water and cook the noodle till transparent.

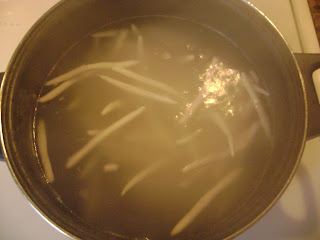
5. Once the noodle is cooked, drain and put them into a mixing bowl, add one teaspoon of olive and toss the noodle around (to prevent them from sticking to each other). The noodles turn transparent after rinsing in cold water. I'd say you should probably boil it for at least 10 minutes before draining the noodles and rinse it under cold running water. Remember to stir the noodles while boiling to avoid them from turning into a hot boiling glue in the water.
6. Chilled overnight before using.


Wednesday, May 2, 2012

Black Russian Rye Bread

If you have been to Outback Steakhouse, Cheesecake Factory, and/or Bugaboo Creek, then you will clearly understand the need for any home baker to emulate those tasty delicious bread they served to you with whipped butter shortly after you placed your orders. Oh, those sweetish dark brownish morsels of baked dough goodness.....and then it hit you one day, what in God's name are those breads?

I like to think of it as in bread from the pumpernickel/rye family. If only it is that simple. For some, I don't know what reason, it tastes DIFFERENT. I have tried many a recipes that claimed to be the copycats of breads baked in these establishments but no....they didn't come close at all. That's it until I found Beth Hensperger and her Bread Bible. Of course those breads are of Russian's and Eastern European's origin. Why didn't I think of that all those years ago? Bummer!

So, step 1 to identify the recipe to follow is over. I know exactly what I am looking at and the Black Russian Rye Bread came highly recommended by other food bloggers out there. Said to be the closest and even better rendition of those tasty brown morsels of bread served at the above mentioned establishments. Good!

On to the recipe, a quick scan and the first thought that came to my mind was OMG! I have never ever see a longer list of ingredients required to make a load of bread ever in my entire life. I try to convince myself that it came highly recommended and that if I really wanna free myself of the clutches from those chain restaurants (if I am honest, I really don't care too much for their food aside from the bread. Oh, the bread!), I better give it a shot.

Will I ever attempt something like this again, OH, YES! The bread came out absolutely TO DIE FOR! If you have a stand mixer or a bread machine, it should be relatively easy to make this bread with the help of those equipment. Even if you have to knead it with your hands, please try this recipe at least once. This bread is OH, SO WORTH IT!

Russian Black Bread
(Adapted from Beth Hensperger’s The Bread Bible)Makes 2 loaves


Ingredients
2 packages (1 1/2 tablespoons) active dry yeast
Pinch of sugar
1/2 cup warm water (105 to 115 degrees)
2 cups water
1/4 cup molasses
1/4 cup apple cider vinegar
4 tablespoons unsalted butter
1 ounce unsweetened chocolate, chopped fine
1/2 cup whole-wheat flour
3 cups medium rye flour
3 cups unbleached, all-purpose or bread flour
1 cup wheat bran
2 tablespoons caraway seeds or ground caraway
1/2 teaspoon fennel seeds or ground fennel
1 tablespoon salt
1 tablespoon instant espresso powder or instant coffee powder
1 tablespoon minced shallots
1/4 cup cornmeal (optional)
1 tablespoon unbleached all-purpose flour (optional)
1 teaspoon caraway seeds (optional)


Directions

1. In a measuring cup, combine the 1/2 cup warm water, pinch of sugar, and active dry yeast. Stir well to mix. Let stand for 10 minutes till foamy.

2. In a pot, combine 2 cups of water, molasses, apple cider vinegar, butter, and chocolate. Heat over medium heat till butter and chocolate are melted. Set aside.
3. In a large bowl, combine all the three flours. Whisk till they are well-mixed. Set aside.
4. In the mixer bowl attached with the paddle attachment, place 2 cups of mixed flours, the wheat bran, 2 tablespoon of caraway seeds, fennel, salt, espresso, and shallots.Turn mixer on to low speed. Gradually, add in the yeast and chocolate mixture to form a smooth batter. Beat at medium speed for 3 minutes.
5. Reduce mixer's speed to low. Gradually, add in mixed flours, half a cup at a time, till dough clears the side of bowl. Dough should be sticky but firm.
6. Stop the mixer. Remove the paddle attachment from mixer. Scrape paddle clean of dough. Replace with dough hook.

7. Turn mixer speed to low. Continue to add mixed flour to dough, 1/4 cup at a time, with the machine running till dough clears the side of bowl. You will have at least 1/2 cup to 3/4 cup of mixed flours left. Let dough continues to knead for the next 3 minutes on low. 
8. Once dough is done kneading, gently roll dough out onto a lightly floured work surface. Use the remaining mixed flours to dust your work station. Form dough into a ball. 

9. Lightly, grease your mixer's bowl with vegetable oil. Place dough in bowl and turn it over once to grease the other side of the dough. Place a cling wrap over the bowl. Cover with a clean kitchen towel. 

Let rise in a warm place for 1 1/2 to 2 hours. 

10. Once dough is done proofing, gently deflate dough. 

Divide dough into 2 portions on a lightly floured surface.
11. Form into rounds. Place seam side down on parchment lined baking sheet.

12. Cover loosely with plastic wrap. Let rise for 45 mins to 1 hour.

13. Preheat oven to 350F. Slash a X on top of the dough right before baking.
14. Bake for 45-50 minutes. Bread is done when you can hear a hollow sound when bread is tapped lightly with your fingers. If you have an instant read thermometer, the temperature should read between 200F and 210F. Mine takes about 60-65 minutes to bake.  
15. Let cool completely on a wire rack before slicing.


Note: 
-The original recipes called for the caraway and fennel used in the recipe to be in the seeds form. However, if you are like me, and do not like to bite into seeds when eating your slice, grind the seeds into powder before adding it into your dough.
-I have made this bread using ground cumin instead of caraway. It tasted great if you are a cumin fan.
- The recipe calls for wheat bran, which essentially is the outer husk of wheat. I have substitute the wheat bran with wheat germ (the inner part of the wheat) using what I have on hand aka "I have totally forgotten to buy the wheat bran on my last grocery trip", it works just fine.
-If you like a darker color bread, closer to pumpernickel, increase the molasses from 1/4 cup to 1/2 cup
- An instant read thermometer is really handy in this case. The color of the rye flour, molasses, and chocolate in the recipe makes it almost impossible to approximate if the bread is done by visual appearance.
- You can also shape them into loaves and bake in a loaf pan for 50 - 55 mins.
- If you choose to make this into petite rolls, divide dough into 16 portions. Shape into rounds. Bake for 20- 25 mins.