Tuesday, May 31, 2011

Grilled Pork Chops with Molasses and Balsamic Glaze

I love and hate grilling season. Love the fact that grilling season represents the lovely summer months after the snow laden winter here in New England. Hate the fact that my limited grilling ideas for meat caused a repetition of recipes more often than I would have like. Not that there aren't a multitude of grilling marinades, sauces and dry rub to choose from, I am constraint with the fact that my mom is a finicky eater. She likes everything plain while my husband, dad and myself love flavor.

Combining molasses and balsamic vinegar has always been a great idea for grilling. I can only imagine the wonders of a sweet tang marinade can do to anything on the grill. After I saw this recipe on Cafe Sucre, I can't help myself but to go ahead and try it even if mom disapproves. I am glad I did. The result was a superbly flavored pork chops that everyone loves. One more great grilling marinade to add to my collection.

Grilled Pork Chops with Molasses and Balsamic Glaze
(Adapted from Cafe Sucre)
Ingredients
4 bone-in pork chops, about 1 1/2 inch thick
3 Tbsp salt
3 Tbsp brown sugar
Enough water to cover pork chops

For the Molasses and Balsamic Glaze
1 cup balsamic vinegar
1/2 small onion, coarsely chopped
6 sprigs of fresh thyme
2 sprigs fresh rosemary
2 cloves garlic, peel and smashed  with the back of a knife
2 cups chicken stock  (low sodium)
1/2 cup molasses
1 tablespoon Dijon mustard
1/4 teaspoon crushed red pepper
 
Directions
Step 1: Prepare the brine for the pork by combining the salt and brown sugar in a big bowl. Add enough water to cover the pork chops. Submerge the pork chops into the brine. Leave in the refrigerator for 2-4 hours.

Step 2: Prepare the marinade/glaze. Combine balsamic vinegar, thyme, rosemary, garlic and onion in a saucepan. Cook over medium heat till mixture comes up to a boil. Continue to boil for 10 minutes till vinegar is reduced to about 1/3 cup. Add in chicken stock into the mixture. Cook over high heat for 20 minutes till reduced to about 2/3 cup. Strain vinegar to remove herbs, garlic and onion.

Step 3: Return strained vinegar into the saucepan.

Step 4: Add in mustard, crushed red peppers and molasses. Set aside to cool.

Step 5: Once glaze is cool enough, add about 2/3 cup of the glaze to the pork chops to use as marinade. Marinade pork chops in the refrigerator for about 1 hour before grilling.

Step 6: Preheat grill to 450F. Grill pork chops till cooked, basting occasionally with the leftover marinade.

Step 7: Serve pork chops with the reserved glaze, grilled vegetables and a nice cold pasta salad.


Friday, May 27, 2011

Pigs in A Blanket

Following the success using the basic sweet dough to make the filled bun the other day, my family made a request and asked if I can make them pigs in a blanket. For the uninitiated, pigs in a blanket is just hot dogs wrapped with a puff pastry or sweet bun dough. This item is particularly popular in the Asian bakery, especially with kids. Who doesn't love hot dogs, especially when they come out looking this cute?

For the pigs in the blanket, all I did was using the same sweet bun dough recipe, portion the dough and wrap it around the hot dogs. As simple as that. If you have the time to make it over the weekend, these hot dog buns are a great lunch box item.

Hong Kong Bakery Style - Pigs in A Blanket
Ingredients

For Water Roux
50g bread flour
250ml water


For Bread Dough
285g King Arthur's Bread Flour
60g sugar
1/4 tsp salt
2 tsp active dry yeast
1/2 egg, beaten
84ml warm milk
84ml prepared water roux
40gm softened butter

For Filling
6 hot dogs, halved 

For glaze
1/2 beaten egg
1 Tbsp sugar + 1 Tbsp water

Directions

Step 1: Prepare water roux. Combine water and flour in a saucepan. Cook over medium heat. Whisk constantly till mixture forms a paste, about 3-5 mins. Dish out into a bowl. Cover with plastic wrap and let cool. Water roux can be made ahead of time and store in the refrigerator for at least 3 days.

Step 2: In a bread machine, combine milk, water roux, beaten eggs, softened butter, sugar and salt.

Step 3: Add in flour and yeast. Set bread machine to dough cycle.

Step 4: As soon as dough comes together, remove from bread machine. Place dough in a well greased bowl. Cover with a clean tea towel and let rise in a warm place for 40 minutes to 1 hour.

Step 5: Once proofing is done, divide dough to 12 equal portions. Using your hands, shape dough into a long strips. Wrap around hot dog by twisting the dough around to cover the hot dogs. Crimp the edge to seal.

Step 6: Placed dough, sealed side down on a baking sheet lined with parchment paper. Let rest for 30 minutes till dough is puffy. Preheat oven to 350F or 176C.


Step 7: Mist the dough with water and brush with beaten egg yolks. Bake for 13 minutes. Remove from oven. Glaze bun with sugar and water mix. Continue baking for another 3 minutes till it comes out slightly golden brown.

Perfect afternoon snack.


Thursday, May 26, 2011

Hong Kong Bakery Style Baked BBQ Meat Bun - Char Siew Chan Bao

I grew up eating Hong Kong style bun even though I was no where near Hong Kong at the time. Thanks to the British, Hong Kong bakery style bread and pastry are very much influenced by its colonial past. After all, it was not until 1997 when the island was eventually returned to mainland China. The popularity of Hong Kong bakery style bun in Asia is phenomenal. Almost all modern day bakeries in the Asia Pacific region sell buns like these.


The distinction between Hong Kong bakery style bread and the west is the filled buns. Unlike the coveted freshly baked loaves of baguettes, rye, or pumpernickel, the Asian bakery boost its scrumptious petite looking sweet or savory filled buns. The only plain loaf available in these bakeries will be sandwich bread. I always thought it was strange that the filled bun culture did not catch on here in the States. Its closest comparison will be a submarine sandwich, only a lot smaller and with the filling baked into the bun instead of being assembled on after the bread is baked.


Another distinct feature of these buns is its soft and light texture, as the bakers used the water roux method in making the bun dough. The method simply combines water and flour, cooked over medium heat till gluey. The addition of the flour-water mix helps to develop gluten in the bread whilst keeping the bun moist and light. You do not want a hard crust to develop on these buns as it is meant to come out soft. Simply put, these buns are the perfect meal on the go. No cutlery or napkin required.

Hong Kong Style Baked BBQ Meat Bun or Char Siew Charn Bao
Ingredients

For Water Roux
50g bread flour
250ml water


For Bread Dough
285g King Arthur's Bread Flour
60g sugar
1/4 tsp salt
2 tsp active dry yeast
1/2 egg, beaten
84ml warm milk
84ml prepared water roux
40gm softened butter

For Chinese BBQ Pork Filling
2 1-inch thick boneless pork chops or chicken breast
1 Tbsp Chinese cooking wine or dry sherry
1/2 tsp 5 spice powder
1/4 cup hoisin sauce
1 Tbsp soy sauce
1 Tbsp dark soy sauce
1 tsp black pepper
1 tsp salt
1/2 cup sugar

2 shallots, finely chopped
2 Tbsp cooking oil
4 Tbsp cornstarch
3 Tbsp cold water

For glaze
1/2 beaten egg
1 Tbsp sugar + 1 Tbsp water

Directions
Step 1: Prepare filling for bun. In a bowl, combine diced meat with all the seasoning ingredients. Add in sugar last. Mix well to combine. Refrigerate for an hour or more.

Step 2: In a hot pan, heat 2 Tbsp oil over medium high heat. Saute shallots till golden brown.

Step 3: Add in the meat. Cook for 10 minutes, stirring occasionally. When filing is cooked, combined corn starch and water to make a slurry. Slowly, add in slurry while stirring. Cook for another minute till sauce has thickened and appears gluey.

Step 4: Dish filling into a bowl. Let cool completely. Refrigerate. Filling can be make up to 2 days ahead of time.

Step 5: Prepare water roux. Combine water and flour in a saucepan. Cook over medium heat. Whisk constantly till mixture forms a paste, about 3-5 mins. Dish out into a bowl. Cover with plastic wrap and let cool. Water roux can be made ahead of time and store in the refrigerator for at least 3 days.

Step 6: In a bread machine, combine milk, water roux, beaten eggs, softened butter, sugar and salt.

Step 7: Add in flour and yeast. Set bread machine to dough cycle.

Step 8: As soon as dough comes together, remove from bread machine. Place dough in a well greased bowl. Cover with a clean tea towel and let rise in a warm place for 40 minutes to 1 hour, depending on the weather.

Step 9: This is my dough after an hour as it is hot and humid out. If the weather at your place is similar, shorten the proofing time to 40 minutes.


Step 10: Cut dough into 12 pieces. Flatten dough with your hands to form a 4-inch diameter round. Place 2 heaping tablespoon of filling into the center of dough. Crimp edges together to seal. Placed form bun, crimp side down, on a baking sheet lined with parchment. (Sorry, no pics there. Fingers were extremely greasy!)

Step 11: Cover dough with a clean kitchen towel. Let rise for 30 minutes. Meanwhile, preheat oven to 350F or 176C.

Step 12: Once second proofing is done, mist the bun using a spray bottle filled with clean cold water.

Step 13: Brush the remainder beaten egg on buns. Bake for 18 minutes. Remove bun from oven. Glaze with sugar and water mix. Return buns to oven and bake for another 3-5 minutes till done.

Step 14: Let bun cool for 10 minutes before serving. It keeps well in the refrigerator for 5 days. To reheat, simply place in a preheated 350F oven for 5 minutes or nuke in the microwave oven for 1 minute.

The best part about making your own Char Siew Charn Bao at home is the amount of sauce and filling you can place inside the bun. Believe me, you will not find any bakery out there selling these buns with the amount of filling you see in this picture.


Wednesday, May 25, 2011

Lemon Tea Cakes

I saw this recipe on Mary's One Perfect Bite website and I can't help myself but to make it immediately. The way she described this light lemony petite cakes bursting with citrus flavor had me go gaga over the concoction. Yes, I am a lemon head. I always have lemons on hand, will usually get a couple of fresh lemons and a few lime when I go to the store. It is good to love lemon!

Lemon Tea Cakes
( Adapted from One Perfect Bite)
Makes 20-24 small cakes

Ingredients

2 cups all purpose flour
2 1/2 tsp baking powder
1/4 tsp salt
2/3 cup unsalted butter, softened
1 cup sugar
3 large eggs
2/3 cup whole milk
Zest from 1 lemon
1/4 tsp vanilla (optional)

Glaze: Combine 1/3 cup of fresh lemon juice and 2/3 cup of sugar

Directions
Step 1: Combine flour, baking powder and salt in a bowl. Mix well. Set aside. Preheat oven to 350F or 176C.

Step 2: Greased and floured 2- 12 cups muffin tins.

Step3: Beat the softened butter till light and fluffy.

Step 3: Add in 1 cup of sugar and continue to beat till light and well combined.

Step 4: Beat in 1 egg at a time. Make sure eggs are well incorporated into mix after each addition. Add in the vanilla now, if using.

Step 5: Add in flour to mix in 3 batches. Start with the first batch of flour. Mix on low till it is well incorporated.

Step 6: Alternate with milk in 2 batches. This will make it easier to incorporate all the flour into the cake batter. Scrape the side of the bowl occasionally. Fold the lemon zest into the cake batter.

Step 7: Once batter is prepared, spoon batter into muffin tins about 2/3 full. You will get between 20 and 24 cakes. Bake for 20-25 minutes till a toothpick inserted into the center of cake comes out clean. It takes me 20 minutes to bake the cakes. Let cake cool in muffin tin on wire rack for 5 minutes.

Step 8: Meanwhile, prepare the glaze by combining 1/3 cup fresh lemon juice with 2/3 cup of sugar. Mix to combine.

Step 9: Place a wire rack onto a baking sheet lined with wax or parchment paper. Remove the cakes from the muffin tins, placing them upside down. Glaze the cakes while it is still hot. Use all the lemon glaze. Let cool for another 5 minutes and serve with coffee or tea.

Updates: The Lemon Tea Cakes are all gone within 2 days. That is a first in this house. That goes to show how good this cakes are.

Tuesday, May 24, 2011

Chicken Mole - Mexican Comfort Food

I am having one of those insatiable craving for Mexican food lately. Blame it on the wet and cold weather here in New England. Mexican food has been on my mind a lot...and I mean a lot! I have always love chicken mole and will get them whenever we go out to a Mexican restaurant. Why I have never attempt to make this at home is beyond me? After all, we doesn't love comfort food in weather like this. Speaking of which, does anyone know when summer is coming????

The interesting thing about Mexican food and myself is that I have never liked Mexican food or the American version of Mexican food, at least. During my college days, my friends will ask me to go to the local Mexican food chain near our school. I tried it once and absolutely detest it. It was greasy and salty. That was all I could taste. It wasn't until one of my friend who was originally from Oaxaca in Mexico offered me his mother's homemade tamale with chicken mole that I fell head over heels in love with Mexican food. 


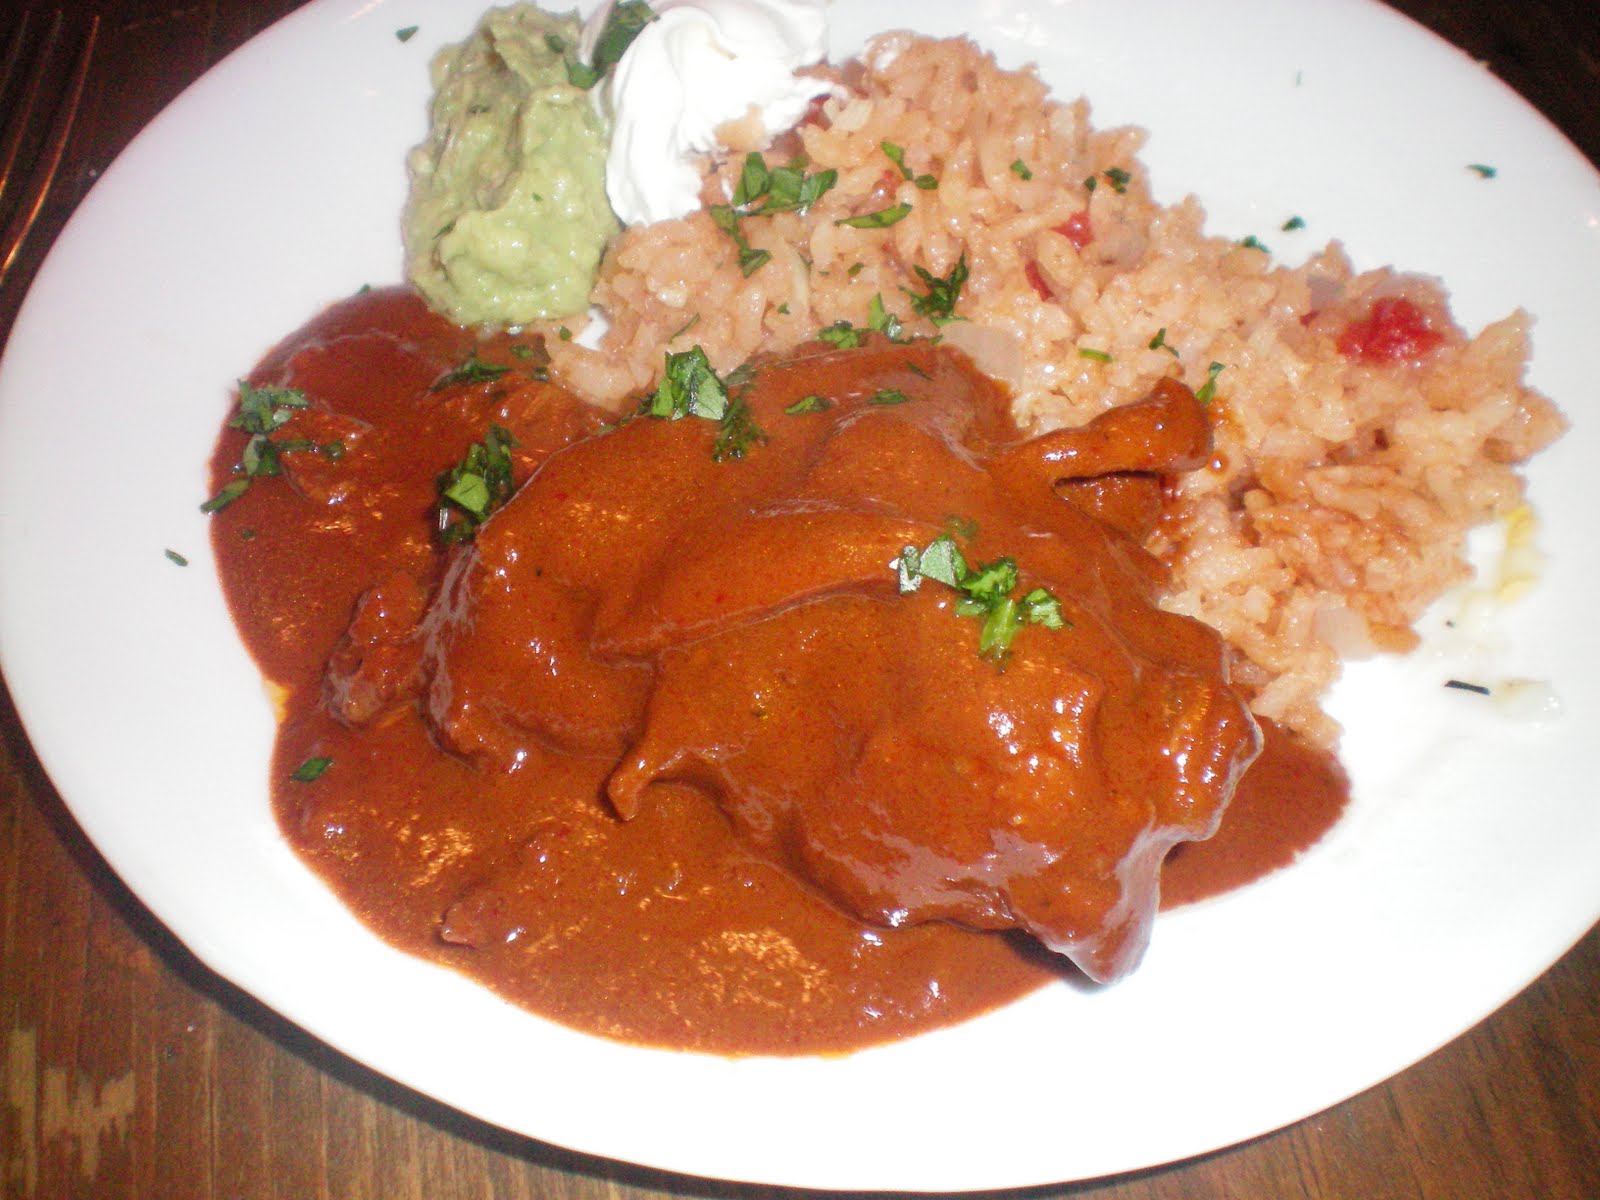
The easiest way to describe the mole sauce is a rich, thick concoction with a wonderful blend of dried peppers and spices. It is somewhat akin to how my grandma will make her curries minus the addition of coconut milk. The addition of chocolate in the mole sauce gives it a rich dark flavor. It doesn't taste like eating chocolate at all, if you are wondering. The chicken mole comes out all nice, warm and comforting in a cold rainy day. Bliss!

Mexican Chicken Mole
(Recipe adapted from Food Network and my own twist)
1 chicken, about 4lbs cut into 8 pieces
1 medium onion, quartered
5 cloves garlic, peeled and smashed
1 sprig fresh oregano
1 sprig thyme
Cilantro stems
10 black peppercorns

Mole Sauce
4 dried ancho chillies
4 dried mulato chillies
4 pasilla chillies
1 quart chicken stock
2 Tbsp sesame seed, toasted
2 Tbsp unsalted peanuts, toasted

1/2 ripe banana
4 Tbsp olive oil
1 medium white onion, finely diced
3 cloves garlic, crushed
1/2 cinnamon steak, broken into pieces
2 whole cloves
3 whole black peppercorn
1/2 tsp coriander seeds
1 corn tortilla, torn into small pieces
1 slice white bread, toasted till dark, torn into pieces
2 oz Mexican chocolate or unsweetened chocolate, chopped
2 tsp salt
1/4 to 1/3 cup sugar

Directions
 Step 1: In a large pot, add the chicken, onions, garlic, thyme, oregano, cilantro stems and black peppercorns. Cover chicken with water by 2 inches and bring to a boil. Turn heat down to low and simmer for 20 minutes till chicken is cooked through.

Step 2: Dish out chicken into a bowl. Let cool. Meanwhile, strain chicken stock through a fine strainer and set chicken stock aside.

Step 3: Clean the dried peppers. Remove the seeds and stems. In a hot dry pan, roast the chili peppers till they turn deep brown in color.

Step 4: Add in the hot chicken stock to the peppers and let soaked for 20 minutes to rehydrate peppers.

Step 5: Meanwhile, in a hot dry pan, roast the peanuts, sesame seeds, spices, tortilla pieces and bread. Set aside. Add in a tablespoon of oil to the pan. Saute the onion and garlic. Set aside.

Step 6: When peppers are fully re-hydrated, add the peppers with a few tablespoon of the soaking liquid in a food processor. Pulverize till it forms a paste. Add more liquid if necessary.

Step 7: Add in the onion, garlic, spices, banana, peanuts and sesame seeds. Pulverize till smooth. Add in more liquid if necessary.

Step 8: Add in the thickening agents; the toasted tortilla pieces and bread. Add more stock to the food processor and pulverize till sauce is smooth.

Step 9: In a pot, heat the remaining 3 Tbsp of olive oil. Pour sauce through a fine strainer into the pot. Cook for 5 minutes, stirring constantly. Add in 2 cups of chicken stock, the chocolate, sugar and salt. Bring to a boil.

Step 10: Once sauce begins to boil, add all the chicken into the sauce. Cook, stirring occasionally, for 20 minutes till sauce thickens and chicken is well coated with the mole sauce. Remove from heat and adjust seasoning. Add more salt and/or sugar if necessary.

Serve chicken mole with a side of Mexican rice and corn tortilla, if desired.